
Repository Summary
| Description | |
| Checkout URI | https://github.com/seunghwi0613/ros2_bevfusion_demo.git |
| VCS Type | git |
| VCS Version | main |
| Last Updated | 2023-08-25 |
| Dev Status | UNKNOWN |
| Released | UNRELEASED |
| Contributing |
Help Wanted (-)
Good First Issues (-) Pull Requests to Review (-) |
Packages
| Name | Version |
|---|---|
| bev_msgs | 0.0.0 |
README
BEVfusion_demo
Abstract
This project is based on BEVFusion. The version of BEVFusion using ROS2.
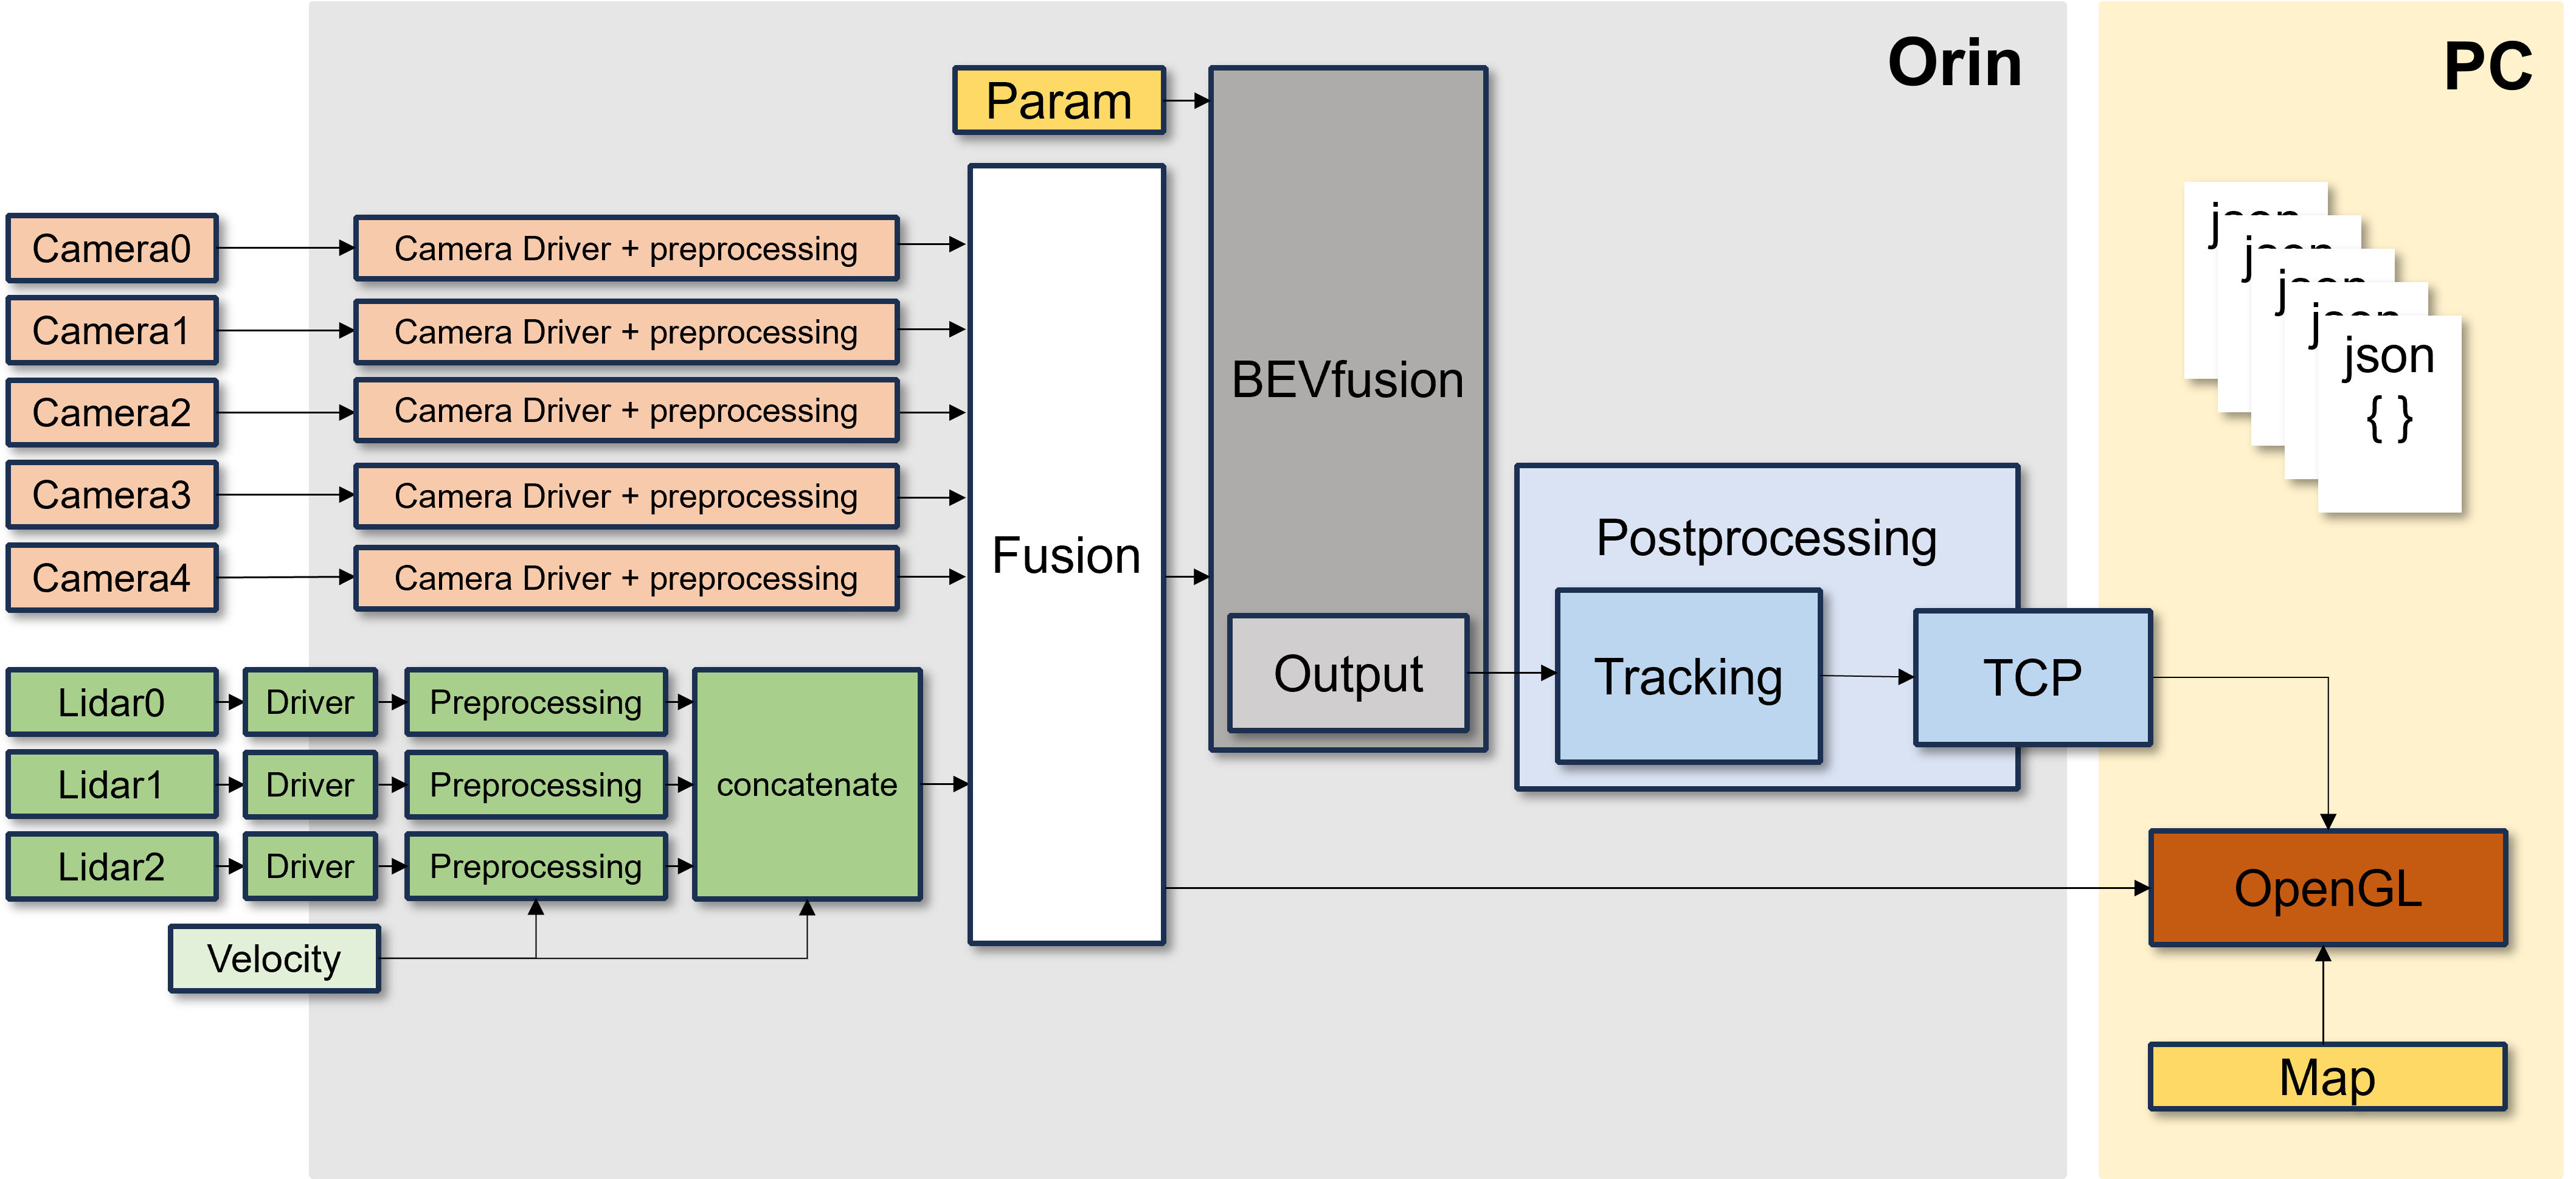
Flow
Usage
Dataset: nuscenes ROS2 bag
Requirements
- ROS2 (Foxy)
- Pytorch
- CUDA 11.4
How to start
Data Preparation
This project is using the nuscenes dataset.
-
Create a
.pklfile containing calibration results. (Details HERE) - Create the
calibration_parameter.yamlfile using the.pklfile.-
sensor2lidarrotation (3x3 matrix), -
sensor2lidartranslation (3x1 matrix), - Intrinsic matrix (3x3 matrix)
-
-
Create four 4x4 matrices below and update the
calibration_parameter.yamlfile. Format:- 6 camera intrinsic 4x4 matrices
- Rotation: camera intrinsic matrix
- Translation: zero matrix
- 6 camera2lidar 4x4 matrices
- Rotation:
sensor2lidarrotation matrix - Translation:
sensor2lidartranslation matrix
- Rotation:
- 6 lidar2camera 4x4 matrices
- Rotation: Transformation of
sensor2lidarrotation matrix - Translation: Convolution of Transformation
sensor2lidartranslation andsensor2lidarrotation matrix
- Rotation: Transformation of
- 6 lidar2image 4x4 matrices
- Using the file
./tools/lidar2image.py- Input: The
calibration_parameter.yamlfile which has the information of the 3 matrices above. - Output: The lidar2image 4x4 matrix
- Input: The
- Add this output matrix to the
calibration_parameter.yamlfile which is used as input
- Using the file
- 6 camera intrinsic 4x4 matrices
- Convert to a
.bagfile using nuscenes2bag.This converts the nuscenes dataset to a ROS1 bag file, so you have to convert it to ROS2 format. We used the library rosbag_convert
Run
torchpack dist-run -np 1 python tools/BEVfusion_exe.py
Detail
We have several points of upgrade from the original BEVfusion.
Number of Sensors
Multiple Cameras & Multiple Lidars We have a preprocessing module because of using 3 Lidars and 6 Cameras. However, this repository is the DEMO version of our project, so we are using 1 Lidar and 1 Camera.
Lidar Preprocessing
Details: Preprocessing_module branch
1Lidar
Differences
Original BEVfusion:
Using a static Dataset
- Large amount of data
- Calibrating all sensors with their own ego_frame (IMU)
- No Tracking ID
- Object detection using Map information inside the model’s own map segmentation
BEVfusion with ROS2:
Using a Realtime Dataset
- It is necessary to manage data efficiently when using realtime data -> Reduce the data size by preprocessing sensor’s raw data
- Remove the IMU dependency for ego_frame (IMU)
- Direct Calibration of Camera to Lidar and transform to Model as parameter type (
.yaml)- Add detected object’s own ID using 2D Object Tracking (
SORTAlgorithm) in the Bird’s-eye view plane- Remove the map segmentation part, and visualize object’s information using the HD map
File truncated at 100 lines see the full file
CONTRIBUTING
Repository Summary
| Description | |
| Checkout URI | https://github.com/seunghwi0613/ros2_bevfusion_demo.git |
| VCS Type | git |
| VCS Version | main |
| Last Updated | 2023-08-25 |
| Dev Status | UNKNOWN |
| Released | UNRELEASED |
| Contributing |
Help Wanted (-)
Good First Issues (-) Pull Requests to Review (-) |
Packages
| Name | Version |
|---|---|
| bev_msgs | 0.0.0 |
README
BEVfusion_demo
Abstract
This project is based on BEVFusion. The version of BEVFusion using ROS2.
Flow
Usage
Dataset: nuscenes ROS2 bag
Requirements
- ROS2 (Foxy)
- Pytorch
- CUDA 11.4
How to start
Data Preparation
This project is using the nuscenes dataset.
-
Create a
.pklfile containing calibration results. (Details HERE) - Create the
calibration_parameter.yamlfile using the.pklfile.-
sensor2lidarrotation (3x3 matrix), -
sensor2lidartranslation (3x1 matrix), - Intrinsic matrix (3x3 matrix)
-
-
Create four 4x4 matrices below and update the
calibration_parameter.yamlfile. Format:- 6 camera intrinsic 4x4 matrices
- Rotation: camera intrinsic matrix
- Translation: zero matrix
- 6 camera2lidar 4x4 matrices
- Rotation:
sensor2lidarrotation matrix - Translation:
sensor2lidartranslation matrix
- Rotation:
- 6 lidar2camera 4x4 matrices
- Rotation: Transformation of
sensor2lidarrotation matrix - Translation: Convolution of Transformation
sensor2lidartranslation andsensor2lidarrotation matrix
- Rotation: Transformation of
- 6 lidar2image 4x4 matrices
- Using the file
./tools/lidar2image.py- Input: The
calibration_parameter.yamlfile which has the information of the 3 matrices above. - Output: The lidar2image 4x4 matrix
- Input: The
- Add this output matrix to the
calibration_parameter.yamlfile which is used as input
- Using the file
- 6 camera intrinsic 4x4 matrices
- Convert to a
.bagfile using nuscenes2bag.This converts the nuscenes dataset to a ROS1 bag file, so you have to convert it to ROS2 format. We used the library rosbag_convert
Run
torchpack dist-run -np 1 python tools/BEVfusion_exe.py
Detail
We have several points of upgrade from the original BEVfusion.
Number of Sensors
Multiple Cameras & Multiple Lidars We have a preprocessing module because of using 3 Lidars and 6 Cameras. However, this repository is the DEMO version of our project, so we are using 1 Lidar and 1 Camera.
Lidar Preprocessing
Details: Preprocessing_module branch
1Lidar
Differences
Original BEVfusion:
Using a static Dataset
- Large amount of data
- Calibrating all sensors with their own ego_frame (IMU)
- No Tracking ID
- Object detection using Map information inside the model’s own map segmentation
BEVfusion with ROS2:
Using a Realtime Dataset
- It is necessary to manage data efficiently when using realtime data -> Reduce the data size by preprocessing sensor’s raw data
- Remove the IMU dependency for ego_frame (IMU)
- Direct Calibration of Camera to Lidar and transform to Model as parameter type (
.yaml)- Add detected object’s own ID using 2D Object Tracking (
SORTAlgorithm) in the Bird’s-eye view plane- Remove the map segmentation part, and visualize object’s information using the HD map
File truncated at 100 lines see the full file