
Repository Summary
| Description | |
| Checkout URI | https://github.com/mlherd/ros2_pi_gpio.git |
| VCS Type | git |
| VCS Version | master |
| Last Updated | 2020-04-13 |
| Dev Status | UNKNOWN |
| Released | UNRELEASED |
| Contributing |
Help Wanted (-)
Good First Issues (-) Pull Requests to Review (-) |
Packages
| Name | Version |
|---|---|
| pi_gpio | 0.8.2 |
| pi_gpio_interface | 0.7.1 |
README
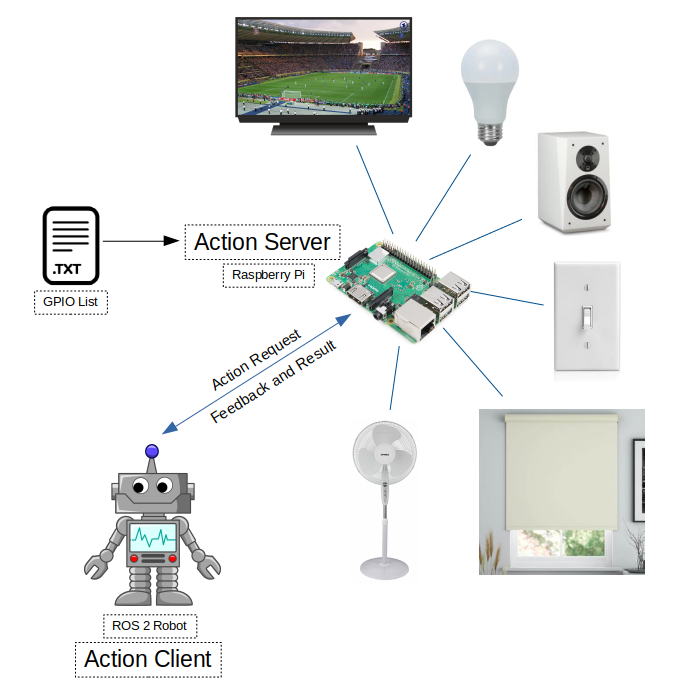
ROS 2 Raspberry Pi GPIO Control Package
ROS 2 package to control Raspberry Pi GPIO pins
This packages allows you set and read Raspberry Pi GPIO pins via ROS 2 action calls.
Tested with Raspberry Pi3, ROS2 Eloquent, and Ubuntu 18.04 Server
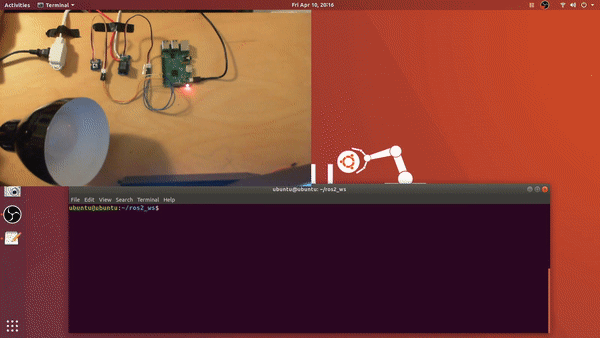
Link to the project video: https://www.linkedin.com/embed/feed/update/urn:li:ugcPost:6654600397346484224
Demo:
1. Build Instructions
 source /opt/ros/<ros2_distro>/setup.bash
 mkdir <your_ros2_ws_name>
 cd your_ros2_ws_name
 mkdir src
 cd src
 git clone https://github.com/mlherd/ros2_pi_gpio.git
 cd ..
 colcon build --sysmlink-install
 source install/setup.bash
2. Usage
-
2.1 Setup Raspberry Pi
- Download Ubuntu Server 64-bit
- https://ubuntu.com/download/raspberry-pi
- Flash the image file on your MicroSD card. I use Etcher on Ubuntu and Rufus on Windows.
- Etcher: https://www.balena.io/etcher/
- Rufus: https://rufus.ie/
- Default user name is ubuntu and password is ubuntu.
- Set up WiFi connection. You can skip this step if you want use the eternet port.
- sudo nano /etc/netplan/50-cloud-init.yaml
- ```
network:
ethernets:
eth0:
dhcp4: true
optional: true
version: 2
wifis:
wlan0:
optional: true
dhcp4: true
access-points:
“
": password: " "
- Download Ubuntu Server 64-bit
        - Save the file and apply the changes
          -
```sudo netplan --debug try
      -  ```sudo netplan --debug generate ```
      -  ```sudo netplan --debug apply ```

- Generate SSH Keys
  -  ```sudo ssh-keygen -A ```

- Install ROS 2 Eloquent
  -  ```https://index.ros.org/doc/ros2/Installation/Eloquent/Linux-Install-Debians/ ```
  - Make sure you install ROS-Base Install (Bare Bones)

- Install development tools and ROS tools
  -  ```https://index.ros.org/doc/ros2/Installation/Eloquent/Linux-Development-Setup/ ```
-
2.3 Edit gpio_pins.txt
-
, - example:
- 17,out
- 18,in
-
-
2.4 Run pi_gpio_server
- You may need to have super user permissions to access GPIO pins
sudo suros2 run pi_gpio pi_gpio_server
-
2.5 Send goals to the action server
- example via command line interface:
- ros2 action send_goal
ros2 action send_goal pi_gpio_server pi_gpio_interface/action/GPIO {'gpio: "17,high"'}ros2 action send_goal pi_gpio_server pi_gpio_interface/action/GPIO {'gpio: "18,low"'}ros2 action send_goal pi_gpio_server pi_gpio_interface/action/GPIO {'gpio: "18,read"'}
- ros2 action send_goal
- example via command line interface:
3. Nodes
-
3.1 /pi_gpio_server
- ROS 2 action server node
-
3.1.1 Actions
- Action name: pi_gpio
- Action type: pi_gpio_interface/action/GPIO
- pi_gpio (pi_gpio_interface/action/GPIO)
- Goal
- string gpio
- Result
- int32 value
- Feedback
- int32 feedback
- Goal
CONTRIBUTING
Repository Summary
| Description | |
| Checkout URI | https://github.com/mlherd/ros2_pi_gpio.git |
| VCS Type | git |
| VCS Version | master |
| Last Updated | 2020-04-13 |
| Dev Status | UNKNOWN |
| Released | UNRELEASED |
| Contributing |
Help Wanted (-)
Good First Issues (-) Pull Requests to Review (-) |
Packages
| Name | Version |
|---|---|
| pi_gpio | 0.8.2 |
| pi_gpio_interface | 0.7.1 |
README
ROS 2 Raspberry Pi GPIO Control Package
ROS 2 package to control Raspberry Pi GPIO pins
This packages allows you set and read Raspberry Pi GPIO pins via ROS 2 action calls.
Tested with Raspberry Pi3, ROS2 Eloquent, and Ubuntu 18.04 Server
Link to the project video: https://www.linkedin.com/embed/feed/update/urn:li:ugcPost:6654600397346484224
Demo:
1. Build Instructions
 source /opt/ros/<ros2_distro>/setup.bash
 mkdir <your_ros2_ws_name>
 cd your_ros2_ws_name
 mkdir src
 cd src
 git clone https://github.com/mlherd/ros2_pi_gpio.git
 cd ..
 colcon build --sysmlink-install
 source install/setup.bash
2. Usage
-
2.1 Setup Raspberry Pi
- Download Ubuntu Server 64-bit
- https://ubuntu.com/download/raspberry-pi
- Flash the image file on your MicroSD card. I use Etcher on Ubuntu and Rufus on Windows.
- Etcher: https://www.balena.io/etcher/
- Rufus: https://rufus.ie/
- Default user name is ubuntu and password is ubuntu.
- Set up WiFi connection. You can skip this step if you want use the eternet port.
- sudo nano /etc/netplan/50-cloud-init.yaml
- ```
network:
ethernets:
eth0:
dhcp4: true
optional: true
version: 2
wifis:
wlan0:
optional: true
dhcp4: true
access-points:
“
": password: " "
- Download Ubuntu Server 64-bit
        - Save the file and apply the changes
          -
```sudo netplan --debug try
      -  ```sudo netplan --debug generate ```
      -  ```sudo netplan --debug apply ```

- Generate SSH Keys
  -  ```sudo ssh-keygen -A ```

- Install ROS 2 Eloquent
  -  ```https://index.ros.org/doc/ros2/Installation/Eloquent/Linux-Install-Debians/ ```
  - Make sure you install ROS-Base Install (Bare Bones)

- Install development tools and ROS tools
  -  ```https://index.ros.org/doc/ros2/Installation/Eloquent/Linux-Development-Setup/ ```
-
2.3 Edit gpio_pins.txt
-
, - example:
- 17,out
- 18,in
-
-
2.4 Run pi_gpio_server
- You may need to have super user permissions to access GPIO pins
sudo suros2 run pi_gpio pi_gpio_server
-
2.5 Send goals to the action server
- example via command line interface:
- ros2 action send_goal
ros2 action send_goal pi_gpio_server pi_gpio_interface/action/GPIO {'gpio: "17,high"'}ros2 action send_goal pi_gpio_server pi_gpio_interface/action/GPIO {'gpio: "18,low"'}ros2 action send_goal pi_gpio_server pi_gpio_interface/action/GPIO {'gpio: "18,read"'}
- ros2 action send_goal
- example via command line interface:
3. Nodes
-
3.1 /pi_gpio_server
- ROS 2 action server node
-
3.1.1 Actions
- Action name: pi_gpio
- Action type: pi_gpio_interface/action/GPIO
- pi_gpio (pi_gpio_interface/action/GPIO)
- Goal
- string gpio
- Result
- int32 value
- Feedback
- int32 feedback
- Goal