
|
robovision_processing package from robovision_ros2 reporobovision_images robovision_processing robovision_rgbd robovision_services robovision_interfaces |
ROS Distro
|
Package Summary
| Version | 0.0.0 |
| License | TODO: License declaration |
| Build type | AMENT_CMAKE |
| Use | RECOMMENDED |
Repository Summary
| Description | |
| Checkout URI | https://github.com/artenshi/robovision_ros2.git |
| VCS Type | git |
| VCS Version | main |
| Last Updated | 2025-01-27 |
| Dev Status | UNKNOWN |
| Released | UNRELEASED |
| Contributing |
Help Wanted (-)
Good First Issues (-) Pull Requests to Review (-) |
Package Description
Maintainers
- roboworks
Authors
RGB Image Processing with OpenCV and ROS
The goal of this repository is to introduce students to RGB image processing using OpenCV and ROS.
1. Getting to know your image
Before starting to manipulate images, we should understand what they are and how we can access their data. In this work, we understand the images as a 2D array, or matrix, where each element (also known as pixel) in the array has a color value. We use three color channels per element in the array: Red, Green, and Blue. The origin of this image matrix is at the top-left corner and column values increase positively from left to right while row values increase positively from top to bottom, as can be seen in the image below:
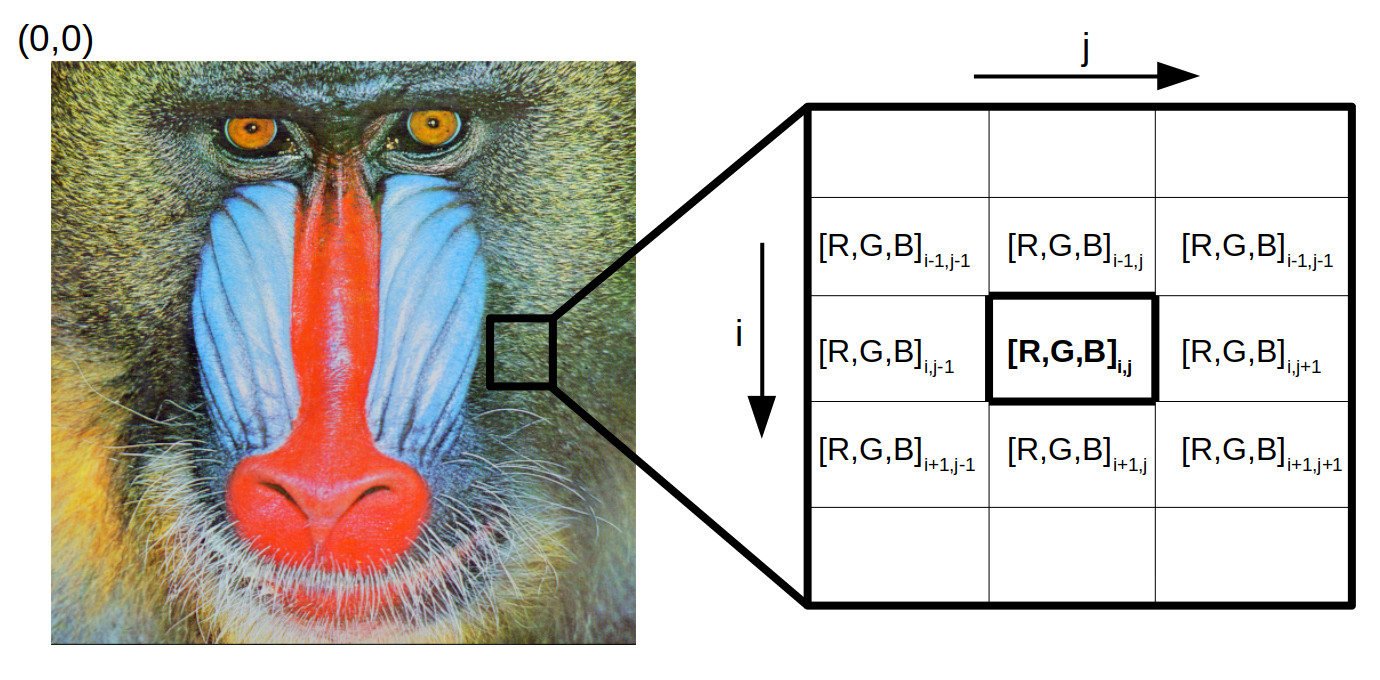
Each color channel has an integer value between 0 and 255. For example, a value of RGB = [255, 0, 0] represents the red color because the value red = 255 is the maximum possible while the green = 0 and blue = 0 values represent the absence of those color. Similarly, RGB = [0, 255, 0] represents the green color and RGB = [0, 0, 255] represents the blue color. The combination of these three channels with different intensities gives us our perception of true color (for example, if you combine different values of red and green you will obtain a range of tonalities of yellow, e.g. RGB = [128, 128, 0]).
2. Basic operations
From our previous tutorial, we learnt how to subscribe to a ROS Image topic in C++:
image_subscriber_ = this->create_subscription<sensor_msgs::msg::Image>(
    "camera/image", 10, std::bind(&ImageProcessingNode::callback_image, this, std::placeholders::_1));
and to transform our ROS Image message to an OpenCV matrix array:
image_ = cv_bridge::toCvCopy(msg, "bgr8")->image;
In Python, to create an Image subscribe:
self.subscriber_ = self.create_subscription(
    Image, "camera/image", self.callback_camera_image, 10)
and to convert it to a matrix array:
bridge_rgb=CvBridge()
self.img = bridge_rgb.imgmsg_to_cv2(msg,msg.encoding).copy()
2.1 Image dimensions
C++
Have a look at the my_processing.cpp file. Let’s inspect our image. First, let’s see the dimensions of our image (we add a counter_ index so we print get these values only in the first iteration):
if (counter_ == 0)
    std::cout << "size: rows: " << image_.rows <<
                 ", cols: " << image_.cols <<
                 ", depth: " << image_.channels() << std::endl;
Let’s test our code. First, we need to compile our code:
cd ~/robovision_ros2_ws
colcon build
Now, as in our previous examples, run:
source ~/robovision_ros2_ws/install/setup.bash
ros2 run robovision_images my_publisher ~/robovision_ros2_ws/src/robovision_ros2/data/images/baboon.png
Finally, in a new terminal, run this command:
source ~/robovision_ros2_ws/install/setup.bash
ros2 run robovision_processing my_processing
where we should be able to see information regarding our image’s size.
Python
Have a look at the my_processing.py file. Similarly, we first determine the dimensions of our image. In Python, we use the shape operator in our matrices, it returns three values (the number of rows, columns and channels) for color images and two values (rows and columns) for grayscale images. So you can use the length of this vector to determine if your image is a multi- or single-channel array.
if (self.counter == 0):
    (rows,cols,channels) = self.img.shape #Check the size of your image
    print ('size: rows: {}, cols: {}, channels: {}'.format(rows, cols, channels))
Now, let’s try our code. In a pure Python project, we can build our code using the --symlink-install flag once and test modifications of our file without the need to build it again; however, in this project, we mix C++ and Python code, so we need to build it every time we make any modification. So, run the following command:
cd ~/robovision_ros2_ws
colcon build
Teen, we run:
File truncated at 100 lines see the full file
Package Dependencies
| Deps | Name |
|---|---|
| ament_cmake | |
| ament_cmake_python | |
| ament_lint_auto | |
| ament_lint_common | |
| rclcpp | |
| rclpy | |
| cv_bridge | |
| sensor_msgs | |
| std_msgs |
System Dependencies
Dependant Packages
Launch files
Messages
Services
Plugins
Recent questions tagged robovision_processing at Robotics Stack Exchange
|
|
robovision_processing package from robovision_ros2 reporobovision_images robovision_processing robovision_rgbd robovision_services robovision_interfaces |
ROS Distro
|
Package Summary
| Version | 0.0.0 |
| License | TODO: License declaration |
| Build type | AMENT_CMAKE |
| Use | RECOMMENDED |
Repository Summary
| Description | |
| Checkout URI | https://github.com/artenshi/robovision_ros2.git |
| VCS Type | git |
| VCS Version | main |
| Last Updated | 2025-01-27 |
| Dev Status | UNKNOWN |
| Released | UNRELEASED |
| Contributing |
Help Wanted (-)
Good First Issues (-) Pull Requests to Review (-) |
Package Description
Maintainers
- roboworks
Authors
RGB Image Processing with OpenCV and ROS
The goal of this repository is to introduce students to RGB image processing using OpenCV and ROS.
1. Getting to know your image
Before starting to manipulate images, we should understand what they are and how we can access their data. In this work, we understand the images as a 2D array, or matrix, where each element (also known as pixel) in the array has a color value. We use three color channels per element in the array: Red, Green, and Blue. The origin of this image matrix is at the top-left corner and column values increase positively from left to right while row values increase positively from top to bottom, as can be seen in the image below:
Each color channel has an integer value between 0 and 255. For example, a value of RGB = [255, 0, 0] represents the red color because the value red = 255 is the maximum possible while the green = 0 and blue = 0 values represent the absence of those color. Similarly, RGB = [0, 255, 0] represents the green color and RGB = [0, 0, 255] represents the blue color. The combination of these three channels with different intensities gives us our perception of true color (for example, if you combine different values of red and green you will obtain a range of tonalities of yellow, e.g. RGB = [128, 128, 0]).
2. Basic operations
From our previous tutorial, we learnt how to subscribe to a ROS Image topic in C++:
image_subscriber_ = this->create_subscription<sensor_msgs::msg::Image>(
    "camera/image", 10, std::bind(&ImageProcessingNode::callback_image, this, std::placeholders::_1));
and to transform our ROS Image message to an OpenCV matrix array:
image_ = cv_bridge::toCvCopy(msg, "bgr8")->image;
In Python, to create an Image subscribe:
self.subscriber_ = self.create_subscription(
    Image, "camera/image", self.callback_camera_image, 10)
and to convert it to a matrix array:
bridge_rgb=CvBridge()
self.img = bridge_rgb.imgmsg_to_cv2(msg,msg.encoding).copy()
2.1 Image dimensions
C++
Have a look at the my_processing.cpp file. Let’s inspect our image. First, let’s see the dimensions of our image (we add a counter_ index so we print get these values only in the first iteration):
if (counter_ == 0)
    std::cout << "size: rows: " << image_.rows <<
                 ", cols: " << image_.cols <<
                 ", depth: " << image_.channels() << std::endl;
Let’s test our code. First, we need to compile our code:
cd ~/robovision_ros2_ws
colcon build
Now, as in our previous examples, run:
source ~/robovision_ros2_ws/install/setup.bash
ros2 run robovision_images my_publisher ~/robovision_ros2_ws/src/robovision_ros2/data/images/baboon.png
Finally, in a new terminal, run this command:
source ~/robovision_ros2_ws/install/setup.bash
ros2 run robovision_processing my_processing
where we should be able to see information regarding our image’s size.
Python
Have a look at the my_processing.py file. Similarly, we first determine the dimensions of our image. In Python, we use the shape operator in our matrices, it returns three values (the number of rows, columns and channels) for color images and two values (rows and columns) for grayscale images. So you can use the length of this vector to determine if your image is a multi- or single-channel array.
if (self.counter == 0):
    (rows,cols,channels) = self.img.shape #Check the size of your image
    print ('size: rows: {}, cols: {}, channels: {}'.format(rows, cols, channels))
Now, let’s try our code. In a pure Python project, we can build our code using the --symlink-install flag once and test modifications of our file without the need to build it again; however, in this project, we mix C++ and Python code, so we need to build it every time we make any modification. So, run the following command:
cd ~/robovision_ros2_ws
colcon build
Teen, we run:
File truncated at 100 lines see the full file
Package Dependencies
| Deps | Name |
|---|---|
| ament_cmake | |
| ament_cmake_python | |
| ament_lint_auto | |
| ament_lint_common | |
| rclcpp | |
| rclpy | |
| cv_bridge | |
| sensor_msgs | |
| std_msgs |