
|
robovision_rgbd package from robovision_ros2 reporobovision_images robovision_processing robovision_rgbd robovision_services robovision_interfaces |
ROS Distro
|
Package Summary
| Tags | No category tags. |
| Version | 0.0.0 |
| License | TODO: License declaration |
| Build type | AMENT_CMAKE |
| Use | RECOMMENDED |
Repository Summary
| Description | RoboVision ROS2 |
| Checkout URI | https://github.com/artenshi/robovision_ros2.git |
| VCS Type | git |
| VCS Version | main |
| Last Updated | 2025-01-27 |
| Dev Status | UNKNOWN |
| Released | UNRELEASED |
| Tags | No category tags. |
| Contributing |
Help Wanted (-)
Good First Issues (-) Pull Requests to Review (-) |
Package Description
Additional Links
Maintainers
- roboworks
Authors
Point Cloud processing with ROS
We present an introduction to Point Cloud data in ROS and propose a simple task where the students should track a person moving in front of an RGBD camera mounted on a mobile robot.
0. Get the additional data
0.1 Rosbag data
Be sure that you have downloaded our additional data available here (Google Drive).
Those folders should be in the ~/robovision_ros2_ws/src/robovision_ros2/data/rosbags/ folder.
To be sure, let’s test it. In one terminal run:
ros2 bag play ~/robovision_ros2_ws/src/robovision_ros2/data/rosbags/person_static --loop
In a second terminal, run this command:
ros2 topic list
You should be able to see several topics!
1. Getting to know your RGBD image
In this lesson, we will apply all that we have learnt in the past two units. First, let’s inspect our code in the rgbd_reader.py file.
In the main function we can see that, as we have done before, we first initialise our node
super().__init__("point_cloud_centroid")
and then, we subscribe to the topics we are going to use:
self.rgb_subscriber_ = self.create_subscription(
    Image, "/camera/rgb/image_rect_color", self.callback_rgb_rect, 10)
self.depth_subscriber_ = self.create_subscription(
    Image, "/camera/depth_registered/image", self.callback_depth_rect, 10)
self.point_cloud_subscriber_ = self.create_subscription(
    PointCloud2, "/camera/depth_registered/points", self.callback_point_cloud, 10)
Here, you can notice the relevance of having our subscribers’ callback functions to update our variables at different rates and a different timer function to process that information. In this case, we subscribe to three topics: an RGB and Depth images and a Point Cloud of 3D points, all of them come from the same RGBD sensor
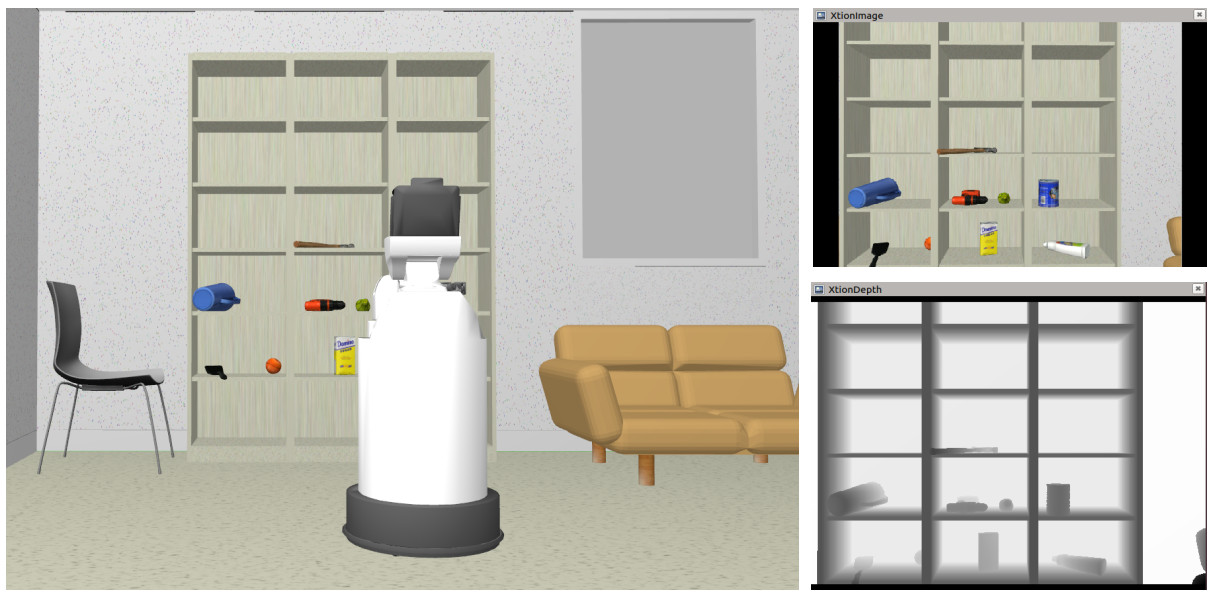
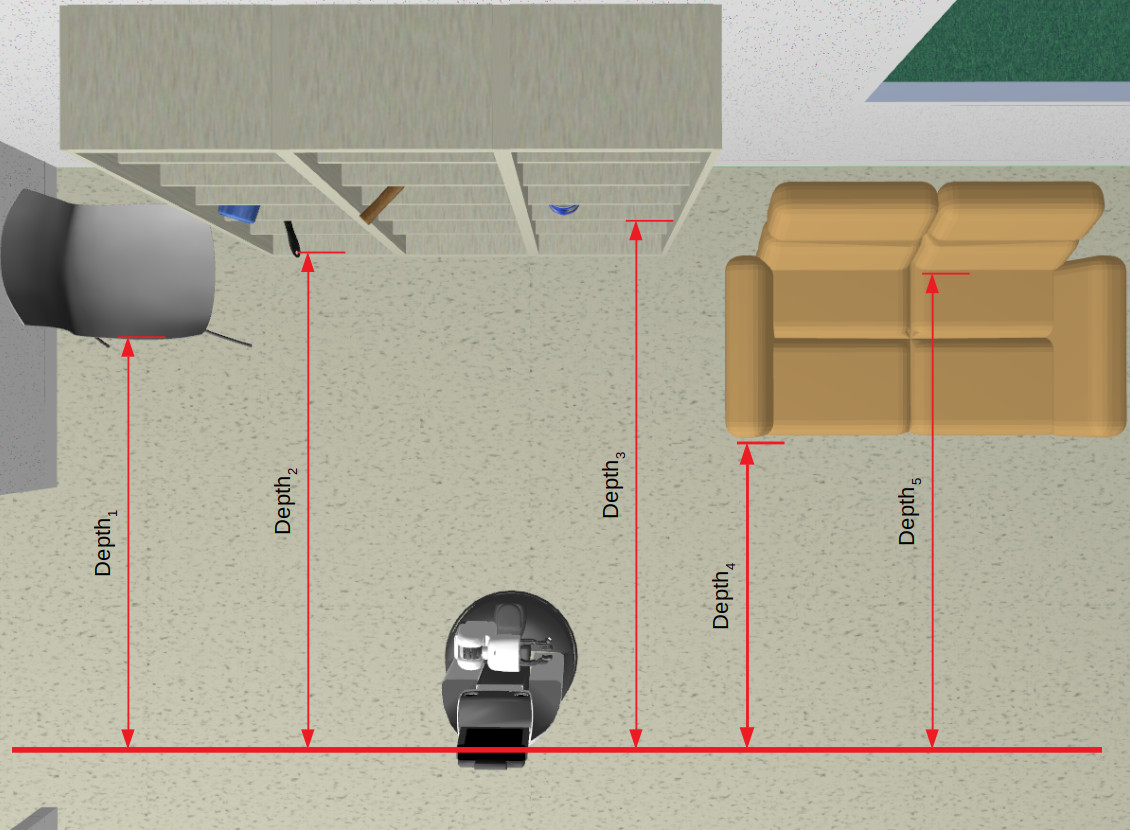
The RGB image is a color image with three channels (Red, Green, and Blue), and the Depth image corresponds to the metric distance of each pixel of the objects in the image to an orthogonal plane that passes through the center of the camera; you can visualise it as the horizontal distance of a given point to the camera seen from above, regardless of the height, as in the Figure
We have used an Image topic for RGB images before. The Depth image is a matrix of floats corresponding to the metric distance in milimeters. Therefore, in the callback function callback_depth_rect we read it as
self.depth_=bridge_depth.imgmsg_to_cv2(msg,"32FC1").copy()
self.depth_mat_ = np.array(self.depth_, dtype=np.float32)
As the values range from 400 (40 centimeters) to 10000 (10 meters), we normalize it to valid image values and save it in an image array to be able to display it
v2.normalize(self.depth_mat_, self.depth_, 0, 1, cv2.NORM_MINMAX)
Important: the Depth information comes from a structured infrared light sensor and therefore very reflective or transparent surfaces tend to distort the depth information; those points appear as black (zero values) pixels in our depth image. The minimum distance our RGBD sensor is able to read is 40 cm, anything closer to that will be a zero value, as well.
Furthermore, from the RGB and Depth images, for every pixel in the image, we can obtain the metric XYZ position in the space – we will not go further on this because, luckily, we see that ROS has already calculated it and the /camera/depth_registered/points of type PointCloud2 provides this information. If you type
ros2 interface show sensor_msgs/msg/PointCloud2
in a terminal, you can see the composition of this type of message.
The point cloud message is a list of tuples (x, y, z, …) in milimeters of the type PointCloud2. Therefore, in the callback function callback_point_cloud we read it as
self.point_cloud_ = np.array(list(pc2.read_points(msg, field_names=None, skip_nans=False)))
This reads the point cloud as a list, so we reshape it as a matrix form aligned to our RGB image
if msg.height > 1:
    self.point_cloud_ = self.point_cloud_.reshape((msg.height, msg.width, -1))

    rows, cols, _ = self.point_cloud_.shape
    print ('new message has arrived; point cloud size: rows: {}, cols: {}'.format(rows, cols))
Back to our code, we see that we have a ROS publisher where we want to publish the 3D position of an object in front of our camera; remember that a topic should have a unique name – in this case, we called it /object_centroid and is of the type Pose:
```python
File truncated at 100 lines see the full file
Package Dependencies
| Deps | Name |
|---|---|
| ament_cmake | |
| ament_cmake_python | |
| ament_lint_auto | |
| ament_lint_common | |
| rclcpp | |
| rclpy | |
| cv_bridge | |
| std_msgs | |
| sensor_msgs | |
| sensor_msgs_py | |
| geometry_msgs | |
| tf2 | |
| tf2_geometry_msgs |
System Dependencies
Dependant Packages
Launch files
Messages
Services
Plugins
Recent questions tagged robovision_rgbd at Robotics Stack Exchange
|
|
robovision_rgbd package from robovision_ros2 reporobovision_images robovision_processing robovision_rgbd robovision_services robovision_interfaces |
ROS Distro
|
Package Summary
| Tags | No category tags. |
| Version | 0.0.0 |
| License | TODO: License declaration |
| Build type | AMENT_CMAKE |
| Use | RECOMMENDED |
Repository Summary
| Description | RoboVision ROS2 |
| Checkout URI | https://github.com/artenshi/robovision_ros2.git |
| VCS Type | git |
| VCS Version | main |
| Last Updated | 2025-01-27 |
| Dev Status | UNKNOWN |
| Released | UNRELEASED |
| Tags | No category tags. |
| Contributing |
Help Wanted (-)
Good First Issues (-) Pull Requests to Review (-) |
Package Description
Additional Links
Maintainers
- roboworks
Authors
Point Cloud processing with ROS
We present an introduction to Point Cloud data in ROS and propose a simple task where the students should track a person moving in front of an RGBD camera mounted on a mobile robot.
0. Get the additional data
0.1 Rosbag data
Be sure that you have downloaded our additional data available here (Google Drive).
Those folders should be in the ~/robovision_ros2_ws/src/robovision_ros2/data/rosbags/ folder.
To be sure, let’s test it. In one terminal run:
ros2 bag play ~/robovision_ros2_ws/src/robovision_ros2/data/rosbags/person_static --loop
In a second terminal, run this command:
ros2 topic list
You should be able to see several topics!
1. Getting to know your RGBD image
In this lesson, we will apply all that we have learnt in the past two units. First, let’s inspect our code in the rgbd_reader.py file.
In the main function we can see that, as we have done before, we first initialise our node
super().__init__("point_cloud_centroid")
and then, we subscribe to the topics we are going to use:
self.rgb_subscriber_ = self.create_subscription(
    Image, "/camera/rgb/image_rect_color", self.callback_rgb_rect, 10)
self.depth_subscriber_ = self.create_subscription(
    Image, "/camera/depth_registered/image", self.callback_depth_rect, 10)
self.point_cloud_subscriber_ = self.create_subscription(
    PointCloud2, "/camera/depth_registered/points", self.callback_point_cloud, 10)
Here, you can notice the relevance of having our subscribers’ callback functions to update our variables at different rates and a different timer function to process that information. In this case, we subscribe to three topics: an RGB and Depth images and a Point Cloud of 3D points, all of them come from the same RGBD sensor
The RGB image is a color image with three channels (Red, Green, and Blue), and the Depth image corresponds to the metric distance of each pixel of the objects in the image to an orthogonal plane that passes through the center of the camera; you can visualise it as the horizontal distance of a given point to the camera seen from above, regardless of the height, as in the Figure
We have used an Image topic for RGB images before. The Depth image is a matrix of floats corresponding to the metric distance in milimeters. Therefore, in the callback function callback_depth_rect we read it as
self.depth_=bridge_depth.imgmsg_to_cv2(msg,"32FC1").copy()
self.depth_mat_ = np.array(self.depth_, dtype=np.float32)
As the values range from 400 (40 centimeters) to 10000 (10 meters), we normalize it to valid image values and save it in an image array to be able to display it
v2.normalize(self.depth_mat_, self.depth_, 0, 1, cv2.NORM_MINMAX)
Important: the Depth information comes from a structured infrared light sensor and therefore very reflective or transparent surfaces tend to distort the depth information; those points appear as black (zero values) pixels in our depth image. The minimum distance our RGBD sensor is able to read is 40 cm, anything closer to that will be a zero value, as well.
Furthermore, from the RGB and Depth images, for every pixel in the image, we can obtain the metric XYZ position in the space – we will not go further on this because, luckily, we see that ROS has already calculated it and the /camera/depth_registered/points of type PointCloud2 provides this information. If you type
ros2 interface show sensor_msgs/msg/PointCloud2
in a terminal, you can see the composition of this type of message.
The point cloud message is a list of tuples (x, y, z, …) in milimeters of the type PointCloud2. Therefore, in the callback function callback_point_cloud we read it as
self.point_cloud_ = np.array(list(pc2.read_points(msg, field_names=None, skip_nans=False)))
This reads the point cloud as a list, so we reshape it as a matrix form aligned to our RGB image
if msg.height > 1:
    self.point_cloud_ = self.point_cloud_.reshape((msg.height, msg.width, -1))

    rows, cols, _ = self.point_cloud_.shape
    print ('new message has arrived; point cloud size: rows: {}, cols: {}'.format(rows, cols))
Back to our code, we see that we have a ROS publisher where we want to publish the 3D position of an object in front of our camera; remember that a topic should have a unique name – in this case, we called it /object_centroid and is of the type Pose:
```python
File truncated at 100 lines see the full file
Package Dependencies
| Deps | Name |
|---|---|
| ament_cmake | |
| ament_cmake_python | |
| ament_lint_auto | |
| ament_lint_common | |
| rclcpp | |
| rclpy | |
| cv_bridge | |
| std_msgs | |
| sensor_msgs | |
| sensor_msgs_py | |
| geometry_msgs | |
| tf2 | |
| tf2_geometry_msgs |