
Repository Summary
| Description | Full Autonomy Stack for Mecanum Wheel Platform |
| Checkout URI | https://github.com/jizhang-cmu/autonomy_stack_mecanum_wheel_platform.git |
| VCS Type | git |
| VCS Version | jazzy |
| Last Updated | 2025-12-18 |
| Dev Status | UNKNOWN |
| Released | UNRELEASED |
| Tags | No category tags. |
| Contributing |
Help Wanted (-)
Good First Issues (-) Pull Requests to Review (-) |
Packages
| Name | Version |
|---|---|
| local_planner | 0.0.1 |
| sensor_scan_generation | 0.0.1 |
| terrain_analysis | 0.0.1 |
| terrain_analysis_ext | 0.0.1 |
| vehicle_simulator | 0.0.1 |
| visualization_tools | 0.0.1 |
| waypoint_example | 0.0.1 |
| tare_planner | 0.0.1 |
| boundary_handler | 0.0.1 |
| far_planner | 0.0.1 |
| graph_decoder | 0.0.1 |
| visibility_graph_msg | 0.0.1 |
| arise_slam_mid360 | 0.0.0 |
| arise_slam_mid360_msgs | 0.0.0 |
| ros_tcp_endpoint | 0.7.0 |
| domain_bridge | 0.5.0 |
| goalpoint_rviz_plugin | 0.0.1 |
| livox_ros_driver2 | 1.0.0 |
| serial | 1.2.1 |
| teleop_joy_controller | 0.0.1 |
| teleop_rviz_plugin | 0.0.1 |
| teleop_rviz_plugin_plus | 0.0.1 |
| waypoint_rviz_plugin | 0.0.1 |
README
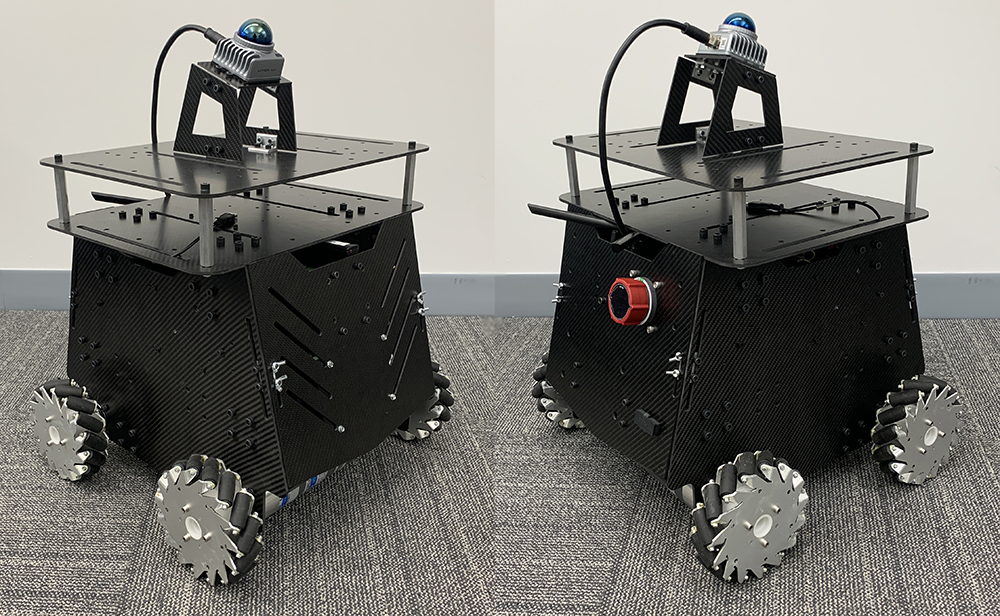
The repository contains the full autonomy stack for the Mecanum wheel platform - T-Bot. The platform is designed to support advanced AI in mind. Sensors installed on the platform include a Livox Mid-360 lidar. Additional sensors can be mounted to the top board with various mounting options available. The platform comes with an Intel NUC i7 computer for running the autonomy stack. Space is left for an additional Nvidia Jetson AGX Orin computer or a gaming laptop to run advanced AI models. The autonomy stack contains a SLAM module, a route planner, an exploration planner, and a base autonomy system, where the base autonomy system further includes fundamental navigation modules for terrain traversability analysis, collision avoidance, and waypoint following. The system overall is capable of taking a goal point and navigating the vehicle autonomously to the goal point as well as exploring an environment and building a map along the way. Alternatively, the system allows users to use a joystick controller to guide the navigation while the system itself is in charge of collision avoidance. We provide a simulation setup together with the real robot setup for users to take advantage of the system in various use cases. The full autonomy stack is open-sourced.
Click here for the product page and the online tutorial.
Simulation Setup
Base Autonomy
The system is integrated with Unity environment models for simulation. The repository has been tested in Ubuntu 24.04 with ROS2 Jazzy. After installing ROS2 Jazzy, add ‘source /opt/ros/jazzy/setup.bash’ to the ‘~/.bashrc’ file and source ~/.bashrc in the terminal to engage the installation.
echo "source /opt/ros/jazzy/setup.bash" >> ~/.bashrc
source ~/.bashrc
Install dependencies with the command lines below.
sudo apt update
sudo apt install ros-jazzy-desktop-full ros-jazzy-pcl-ros libpcl-dev git
Clone the open-source repository.
git clone https://github.com/jizhang-cmu/autonomy_stack_mecanum_wheel_platform.git
In a terminal, go to the folder, checkout the ‘jazzy’ branch, and compile. Note that this skips the SLAM module and Mid-360 lidar driver. The two packages are not needed for simulation.
cd autonomy_stack_mecanum_wheel_platform
git checkout jazzy
colcon build --symlink-install --cmake-args -DCMAKE_BUILD_TYPE=Release --packages-skip arise_slam_mid360 arise_slam_mid360_msgs livox_ros_driver2
Download a Unity environment model for the Mecanum wheel platform and unzip the files to the ’src/base_autonomy/vehicle_simulator/mesh/unity’ folder. The environment model files should look like below. For computers without a powerful GPU, please try the ‘without_360_camera’ version for a higher rendering rate.
mesh/
unity/
environment/
Model_Data/ (multiple files in the folder)
Model.x86_64
UnityPlayer.so
AssetList.csv (generated at runtime)
Dimensions.csv
Categories.csv
map.ply
object_list.txt
traversable_area.ply
map.jpg
render.jpg
In a terminal, go to the repository folder and launch the system.
./system_simulation.sh
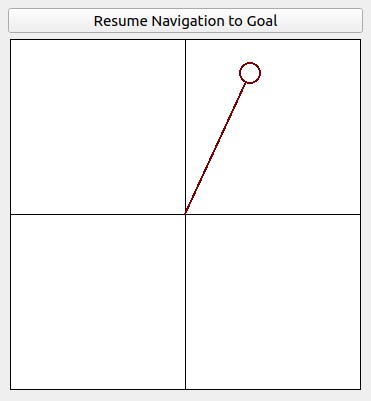
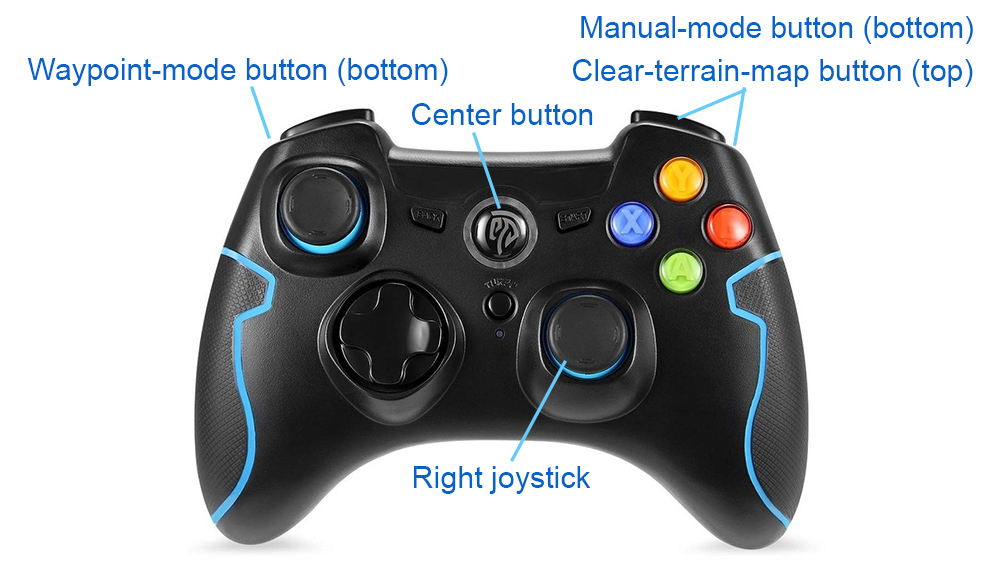
After seeing data showing up in RVIZ, users can use the ‘Waypoint’ button to set waypoints and navigate the vehicle around. Note that the waypoints are meant to be relatively close to the vehicle. Setting the waypoint too far can cause the vehicle to get stuck at a dead end. Users can also operate in smart joystick mode where the vehicle tries to follow joystick commands and also avoid collisions. To do this, users can use the control panel in RVIZ or a PS3/4 or Xbox controller with a USB or Bluetooth interface. When using the joystick controller, users can also operate in manual mode without any collision avoidance. Detailed information about the operations in the three modes is below.
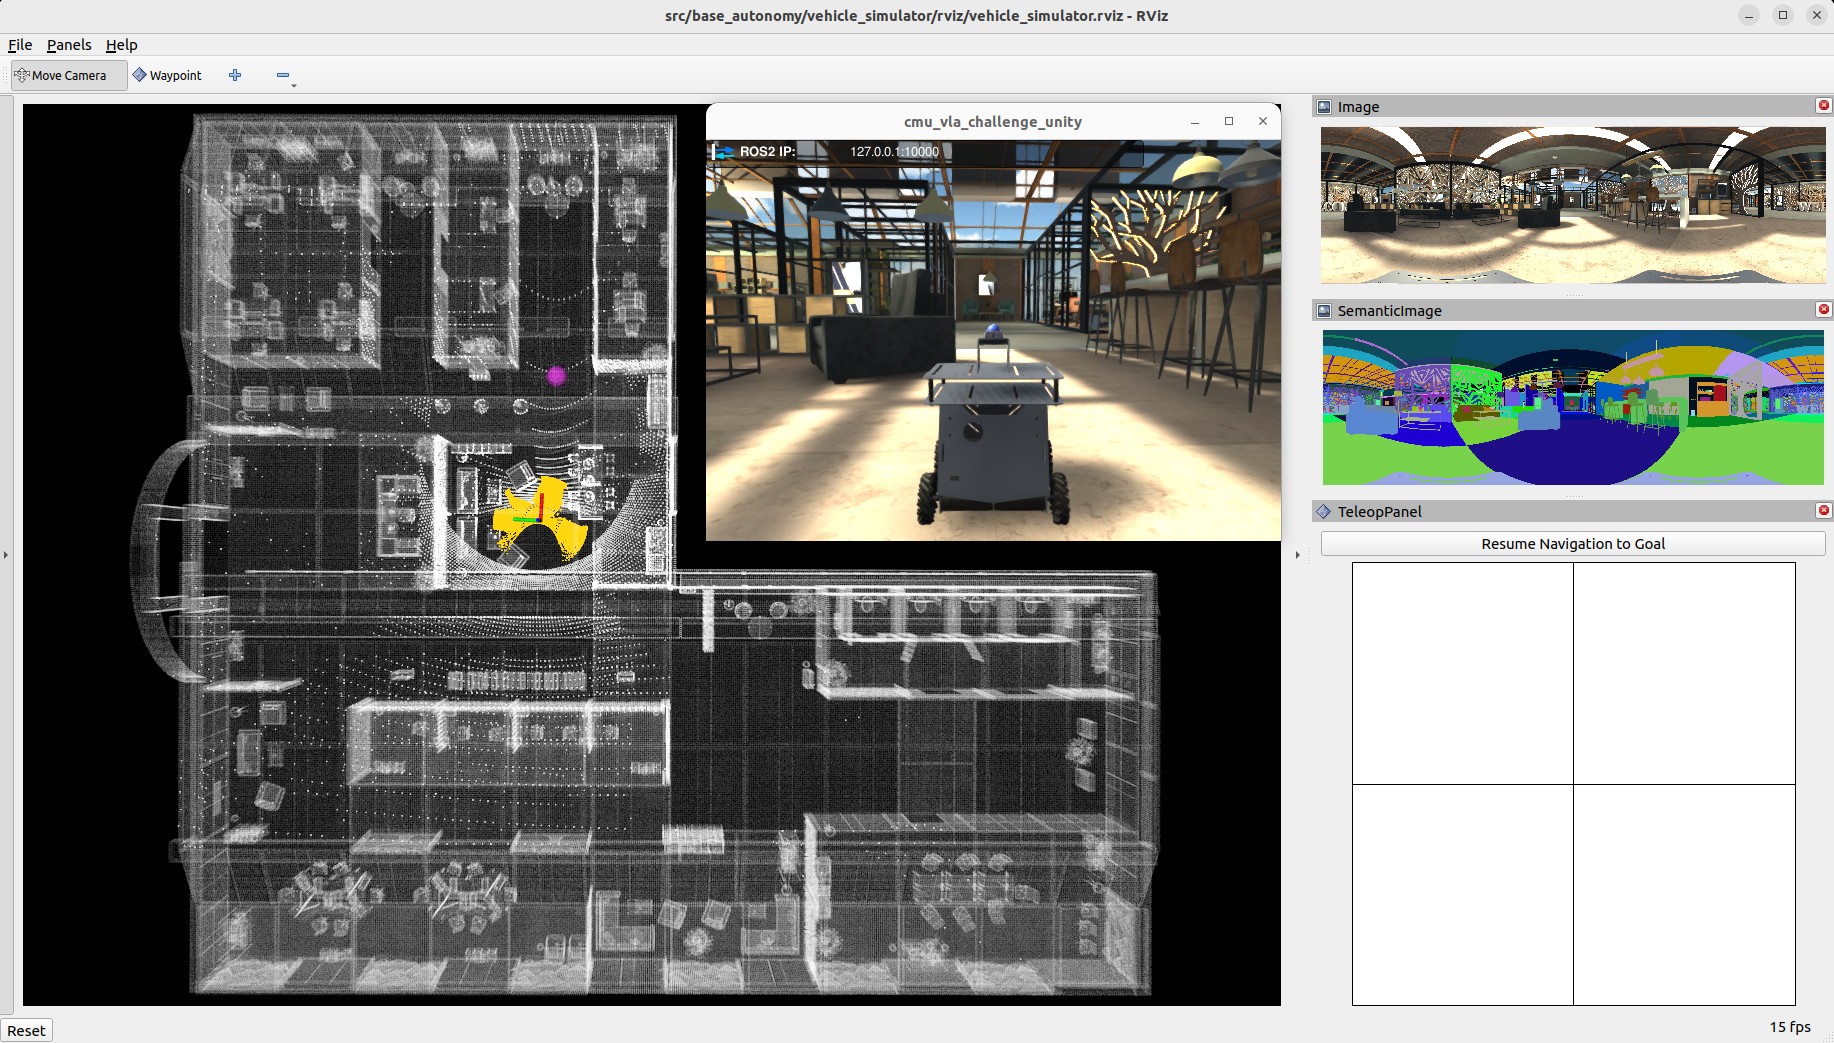
Base autonomy (smart joystick, waypoint, and manual modes)
-
Smart joystick mode (default): The vehicle tries to follow joystick commands and also avoid collisions. Use the control panel in RVIZ or the right joystick on the controller to set the speed and yaw rate. If the system is in another mode, doing so will switch the system to smart joystick mode.
-
Waypoint mode: The vehicle tries to follow waypoints and also avoid collisions. Use the ‘Waypoint’ button in RVIZ to set a waypoint by first clicking the button and then clicking where the waypoint is to be set around the vehicle. If the system is in another mode, clicking the ‘Resume Navigation to Goal’ button in RVIZ switches the system to waypoint mode. Or, users can hold the ‘waypoint-mode’ button on the joystick controller and use the right joystick to set the speed. If only holding the ‘waypoint-mode’ button, the system will use the speed sent in ROS messages.
-
Manual mode: The vehicle tries to follow joystick commands without any collision avoidance. Pressing the ‘manual-mode’ button on the joystick controller switches the system to manual mode. Then, use the right joystick to set the forward and lateral speed and the left joystick to set the yaw rate, in the Mode 2 convention.
Alternatively, users can run a ROS node to send a series of waypoints. In another terminal, go to the folder and source the ROS workspace, then run the ROS node with the command lines below. The ROS node sends navigation boundary and speed as well. Click the ‘Resume Navigation to Goal’ button in RVIZ, and the vehicle will navigate inside the boundary following the waypoints. More information about the base autonomy system is available on the Autonomous Exploration Development Environment website.
source install/setup.sh
ros2 launch waypoint_example waypoint_example.launch
Route Planner
The route planner conducts planning in the global environment and guides the vehicle to navigate to a goal point. To launch the system with route planner, use the command line below.
./system_simulation_with_route_planner.sh
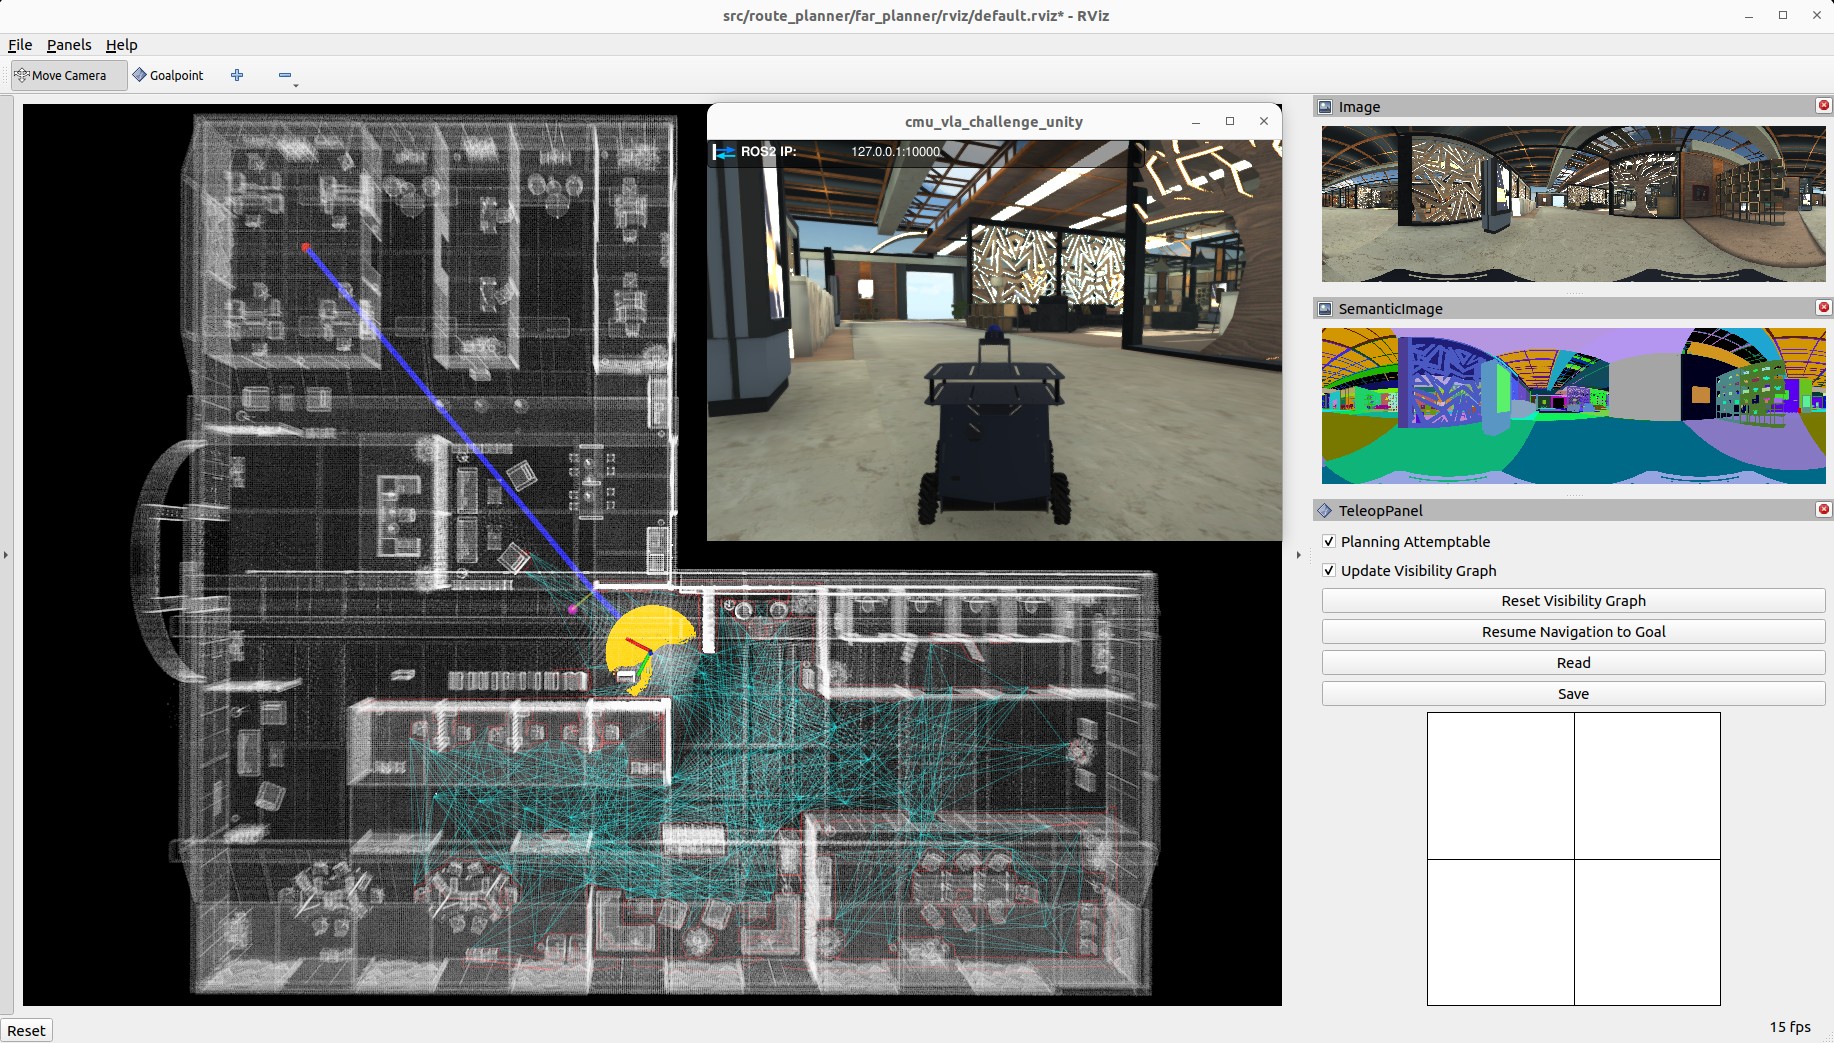
Users can send a goal point with the ‘Goalpoint’ button in RVIZ. The vehicle will navigate to the goal and build a visibility graph (in cyan) along the way. Areas covered by the visibility graph become free space. When navigating in free space, the planner uses the built visibility graph, and when navigating in unknown space, the planner attempts to discover a way to the goal. By pressing the ‘Reset Visibility Graph’ button, the planner will reinitialize the visibility graph. By unchecking the ‘Planning Attemptable’ checkbox, the planner will first try to find a path through the free space. The path will show in green. If such a path does not exist, the planner will consider unknown space together. The path will show in blue. By unchecking the ‘Update Visibility Graph’ checkbox, the planner will stop updating the visibility graph. When navigating with the route planner, the base autonomy system operates in waypoint mode. Users can click in the black box on the control panel to switch to smart joystick mode, or press the buttons on a joystick controller to switch to smart joystick mode or manual mode. To resume route planner navigation, click the ‘Resume Navigation to Goal’ button in RVIZ or use the ‘Goalpoint’ button to set a new goalpoint. More information about the route planner is available on the FAR Planner website.
Base autonomy with route planner
Exploration Planner
The exploration planner conducts planning in the global environment and guides the vehicle to cover the environment. To launch the system with exploration planner, use the command line below.
./system_simulation_with_exploration_planner.sh
Click the ‘Resume Navigation to Goal’ button in RVIZ to start the exploration. Users can adjust the navigation boundary to constrain the areas to explore by updating the boundary polygon in the ‘src/exploration_planner/tare_planner/data/boundary.ply’ file. When navigating with the exploration planner, the base autonomy system operates in waypoint mode. Users can click in the black box on the control panel to switch to smart joystick mode, or press the buttons on a joystick controller to switch to smart joystick mode or manual mode. To resume exploration, click the ‘Resume Navigation to Goal’ button in RVIZ. Note that previously, due to usage of OR-Tools library, the exploration_planner only supports AMD64 architecture. A recent upgrade to the library made it compatible with both AMD64 and ARM computers. On ARM computers, please download the corresponding binary release for the target platform, for example, or-tools_arm64_debian-11_cpp_v9.8.3296.tar.gz, extract it, and replace the ‘include’ and ‘lib’ folders under ‘src/exploration_planner/tare_planner/or-tools’. More information about the exploration planner is available on the TARE Planner website.
File truncated at 100 lines see the full file