
|
giraffe repositorymanipulator imitation-learning ros2 robotic-arm koch embodied-ai lerobot giraffe_control giraffe_description giraffe_hardware giraffe_moveit_config |
Repository Summary
| Description | 🦒 A cost-effective, ROS2-compatible robotic manipulator designed to lower the barriers of entry to Embodied AI. |
| Checkout URI | https://github.com/carpit680/giraffe.git |
| VCS Type | git |
| VCS Version | main |
| Last Updated | 2025-01-09 |
| Dev Status | UNKNOWN |
| Released | UNRELEASED |
| Tags | manipulator imitation-learning ros2 robotic-arm koch embodied-ai lerobot |
| Contributing |
Help Wanted (-)
Good First Issues (-) Pull Requests to Review (-) |
Packages
| Name | Version |
|---|---|
| giraffe_control | 0.0.0 |
| giraffe_description | 0.0.1 |
| giraffe_hardware | 0.0.0 |
| giraffe_moveit_config | 0.3.0 |
README
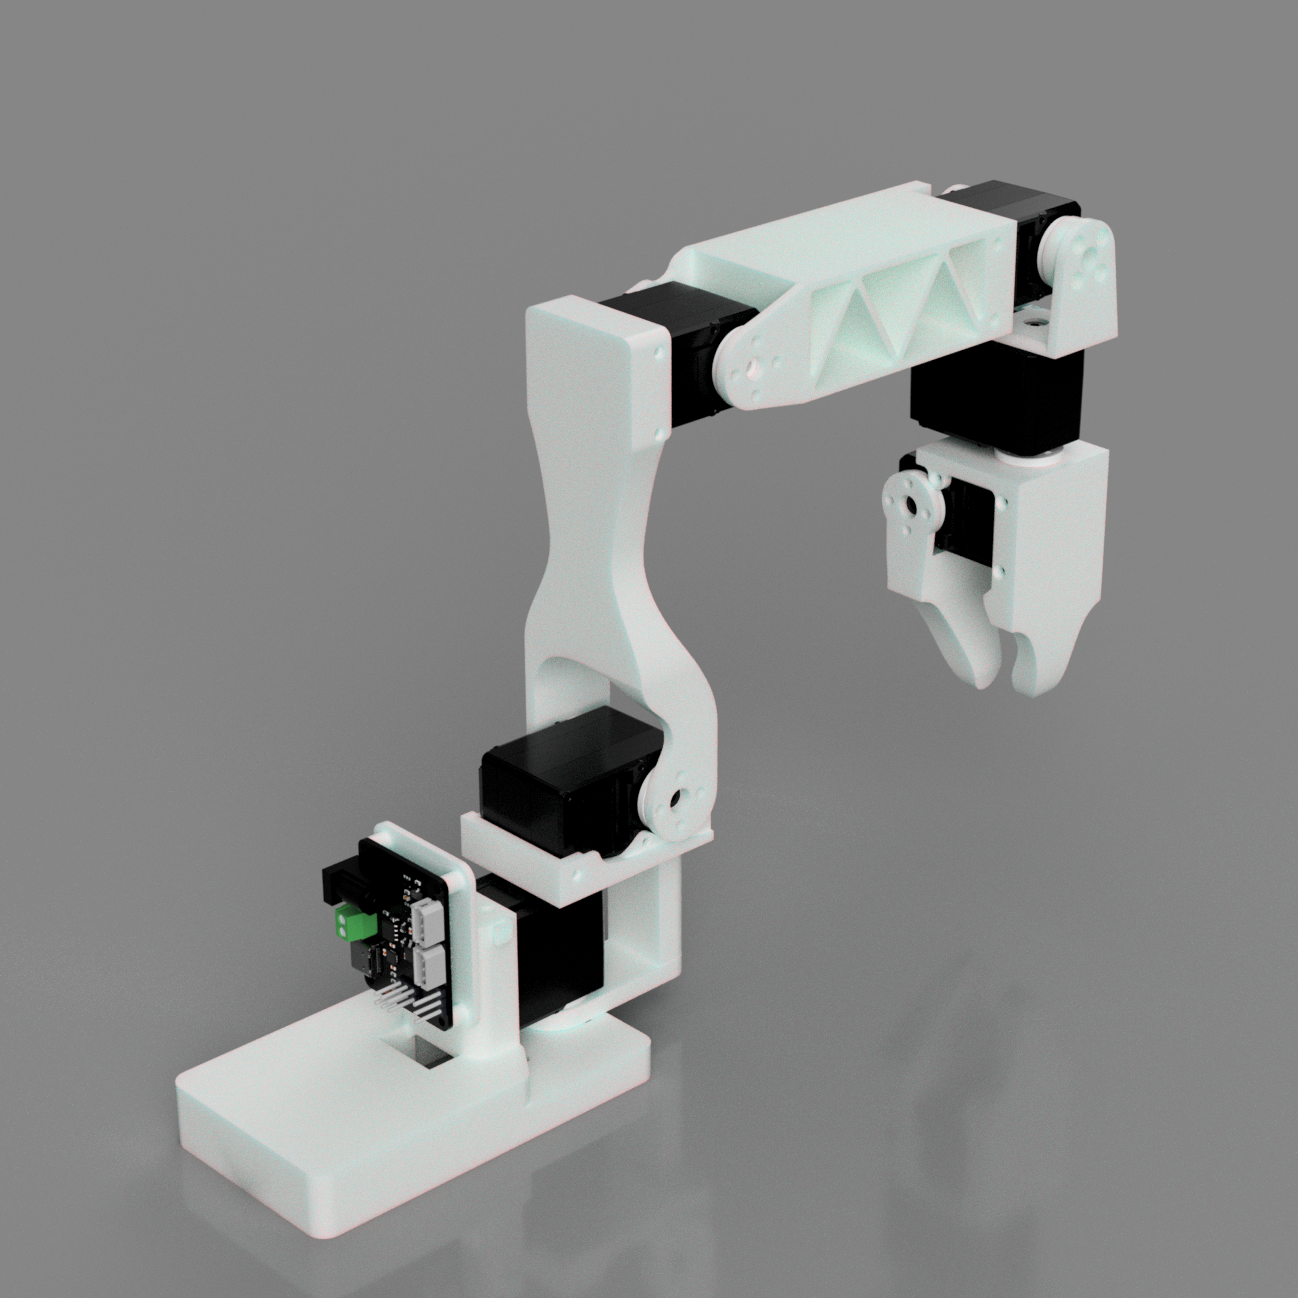
giraffe: a low-cost robotic manipulator 🦒
                                   __             ___  ___
                            .-----|__.----.---.-.'  _.'  _.-----.
                            |  _  |  |   _|  _  |   _|   _|  -__|
                            |___  |__|__| |___._|__| |__| |_____|
                            |_____|

                               Why should fun be out of reach?
A Koch v1.1 inspired even more cost-effective, ROS2-compatible, Open-Source robotic manipulator designed to lower the barriers of entry for Embodied AI and whatever else your robotic dreams may be.
To achieve these outcomes, we implemented the following significant changes:
Servo Selection
We redesigned the arm around cost-efficient Waveshare servos replacing Dynamixel servos, effectively doubling the torque while reducing costs.
Design Enhancements
- Adjusted the base design to transfer the radial load from the base motor to the supporting structure, reducing motor stress.
- Relocated the servo driver closer to the base for cleaner design.
-
The servo mounts were redesigned to utilize the fasteners provided with the servos, minimizing the required assembly components to just the servos, 3D-printed parts, and a screwdriver.
-
Teleop Tongs Integration
We integrated support for Teleop Tongs, another open-source project we built on top of Dex Teleop (for the Stretch 3 mobile manipulator by Hello Robot), designed for teleoperating general-purpose robotic manipulators. This system features a 3D-printed tongs assembly equipped with multiple fiducial markers, serving as a stand-in for the end effector. This design enables intuitive and accessible control of the robotic arm.
The motivation behind this integration was to offer a cost-effective, and user-friendly alternative to a leader & follower arm setup. By using Teleop Tongs, operators can manipulate the robotic arm naturally, simplifying teleoperation for applications in education, research, or DIY robotics projects.
Assembly Instructions
Sourcing Parts
Order the off the shelf parts for the arm using the links below.
| Part | Amount | Unit Cost (India) | Total Cost (India) | Buying Link (India) |
|---|---|---|---|---|
| WaveShare ST3215 30Kg | 6 | ₹1,949.00 | ₹11,694.00 | Robu.in |
| Waveshare Serial Bus Servo Driver Board | 1 | ₹499.00 | ₹499.00 | Robu.in |
| 12V 20A Power Supply | 1 | ₹895.00 | ₹895.00 | Sharvi Electronics |
| Barrel Jack | 1 | ₹48.00 | ₹48.00 | Robu.in |
| Power cord | 1 | ₹95.00 | ₹95.00 | Sharvi Electronics |
| USB-C cable | 1 | ₹60.85 | ₹60.85 | Sharvi Electronics |
| Table clamp | 1 | ₹349.00 | ₹349.00 | Amazon.in |
| Total | ₹14,490 |
Printing The Parts
A variety of 3D printers can be used to print the necessary parts for the arm. Follow these steps for optimal printing results.
1. Select A Printer
When choosing a printer, keep the following recommended specifications in mind. While other printers may work, these spececifications are a good starting point:
- Layer Height: Minimum 0.2mm
- Material: PLA+, ABS, PETG, or other durable plastics
- Nozzle Diameter: Maximum 0.4mm
- Infill Density: Approximately 30%
- Suggested Printers: Prusa Mini+, Bambu P1, Ender3, and similar models
2. Prepare The Printer
-
Materials Needed:
- Standard Glue Stick
- Putty Knife
-
Setup and Printing Process:
- Calibrate the printer and level the print bed following your printer’s specific instructions.
- Clean the print bed, removing any dust or grease. If you use water or other cleaning agents, ensure the bed is fully dry.
- Apply a thin, even layer of glue to the print area. Avoid uneven application or clumps.
- Load the printer filament according to the printer’s guidelines.
- Adjust the printer settings to match the recommended specifications listed above.
- Verify the file format, select files from the hardware folder, and begin printing.
3. Print The Parts
Print one of each part found in CAD/STL
List of Parts:
- base_retainer
- base
- driver_mount
- elbow
- gripper
- shoulder_lift
- shoulder_pan
- wrist_1
- wrist_2
File truncated at 100 lines see the full file