
|
nicegui repositorypython website gui frontend interface robotics toolkit scripting webapp interaction interfaces |
|
|
nicegui repositorypython website gui frontend interface robotics toolkit scripting webapp interaction interfaces |
|
|
nicegui repositorypython website gui frontend interface robotics toolkit scripting webapp interaction interfaces |
|
|
nicegui repositorypython website gui frontend interface robotics toolkit scripting webapp interaction interfaces |
|
|
nicegui repositorypython website gui frontend interface robotics toolkit scripting webapp interaction interfaces gui simulator |
Repository Summary
| Description | Create web-based user interfaces with Python. The nice way. |
| Checkout URI | https://github.com/zauberzeug/nicegui.git |
| VCS Type | git |
| VCS Version | main |
| Last Updated | 2025-12-18 |
| Dev Status | UNKNOWN |
| Released | UNRELEASED |
| Tags | python website gui frontend interface robotics toolkit scripting webapp interaction interfaces |
| Contributing |
Help Wanted (-)
Good First Issues (-) Pull Requests to Review (-) |
README
NiceGUI
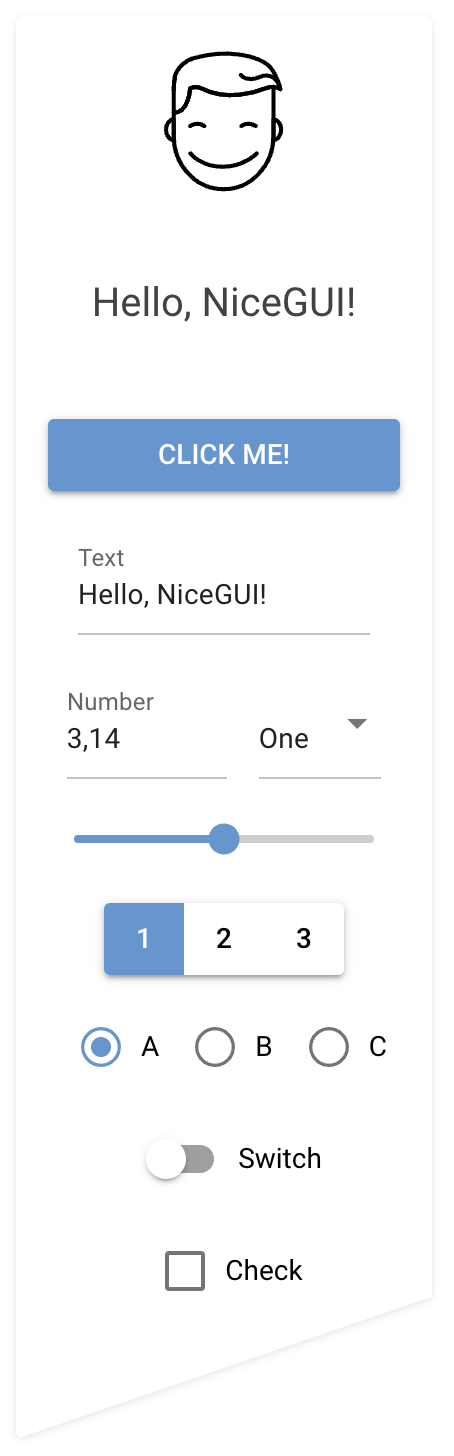
NiceGUI is an easy-to-use, Python-based UI framework, which shows up in your web browser. You can create buttons, dialogs, Markdown, 3D scenes, plots and much more.
It is great for micro web apps, dashboards, robotics projects, smart home solutions and similar use cases. You can also use it in development, for example when tweaking/configuring a machine learning algorithm or tuning motor controllers.
NiceGUI is available as PyPI package, Docker image and on conda-forge as well as GitHub.


![]()

Features
- browser-based graphical user interface
- implicit reload on code change
- acts as webserver (accessed by the browser) or in native mode (eg. desktop window)
- standard GUI elements like label, button, checkbox, switch, slider, input, file upload, …
- simple grouping with rows, columns, cards and dialogs
- general-purpose HTML and Markdown elements
- powerful high-level elements to
- plot graphs and charts,
- render 3D scenes,
- get steering events via virtual joysticks
- annotate and overlay images
- interact with tables
- navigate foldable tree structures
- embed video and audio files
- built-in timer to refresh data in intervals (even every 10 ms)
- straight-forward data binding and refreshable functions to write even less code
- notifications, dialogs and menus to provide state of the art user interaction
- shared and individual web pages
- easy-to-use per-user and general persistence
- ability to add custom routes and data responses
- capture keyboard input for global shortcuts etc.
- customize look by defining primary, secondary and accent colors
- live-cycle events and session data
- runs in Jupyter Notebooks and allows Python’s interactive mode
- auto-complete support for Tailwind CSS
- SVG, Base64 and emoji favicon support
- testing framework based on pytest
Installation
python3 -m pip install nicegui
Usage
Write your nice GUI in a file main.py:
from nicegui import ui

ui.label('Hello NiceGUI!')
ui.button('BUTTON', on_click=lambda: ui.notify('button was pressed'))

ui.run()
Launch it with:
python3 main.py
The GUI is now available through http://localhost:8080/ in your browser. Note: NiceGUI will automatically reload the page when you modify the code.
Documentation and Examples
The documentation is hosted at https://nicegui.io/documentation and provides plenty of live demos.
The whole content of https://nicegui.io is implemented with NiceGUI itself
and can be started locally with docker run -p 8080:8080 zauberzeug/nicegui or by executing main.py from this repository.
You may also have a look at our in-depth examples of what you can do with NiceGUI. In our wiki we have a list of great NiceGUI projects from the community, a section with Tutorials, a growing list of FAQs and some strategies for using ChatGPT / LLMs to get help about NiceGUI.
Why?
We at Zauberzeug like Streamlit but find it does too much magic when it comes to state handling. In search for an alternative nice library to write simple graphical user interfaces in Python we discovered JustPy. Although we liked the approach, it is too “low-level HTML” for our daily usage.
File truncated at 100 lines see the full file
CONTRIBUTING
Contributing to NiceGUI
We’re thrilled that you’re interested in contributing to NiceGUI! Here are some guidelines that will help you get started.
About This Project
NiceGUI is a Python library for building web-based user interfaces with minimal code. It’s designed to be simple, powerful, and fun to use.
Project Structure
-
nicegui/- Core library code (public API) -
nicegui/elements/- Built-in UI elements -
nicegui/functions/- Utility functions -
examples/- Standalone example applications -
website/- Documentation site (nicegui.io) -
tests/- Test suite -
main.py- Runs the documentation website locally
Tech Stack
- Python 3.9+ - Core language
- FastAPI/Starlette - Web framework
- Vue 3 - Frontend framework
- Quasar - UI component framework
- Tailwind CSS 4 - Styling
- pytest - Testing framework
Reporting issues
If you encounter a bug or other issue with NiceGUI, the best way to report it is by opening a new issue on our GitHub repository. When creating the issue, please provide a clear and concise description of the problem, including any relevant error messages and code snippets. If possible, include steps to reproduce the issue.
Code of Conduct
We follow a Code of Conduct to ensure that everyone who participates in the NiceGUI community feels welcome and safe. By participating, you agree to abide by its terms.
Contributing code
We are excited that you want to contribute code to NiceGUI. We’re always looking for bug fixes, performance improvements, and new features.
AI Assistant Integration
This project is designed to work well with AI assistants like Cursor, GitHub Copilot, and others. See AGENTS.md for guidelines specifically for AI assistants that complement this contributing guide.
We provide review instructions for PR reviews in .github/copilot-instructions.md. You should review your changes with an AI assistant before committing/pushing:
In Cursor or VS Code with GitHub Copilot Chat:
Select Agent Mode with claude-4.5-sonnet and write: Review my current branch according to @.github/copilot-instructions.md
[!TIP] In Cursor, you can use these custom commands for easy access:
/review-uncommitted- Review your local uncommitted changes/review-changes- Review your current branch vs main
Ensure to address any valid feedback. That will make your life and that of the maintainers much easier.
Setup
Dev Container
The simplest way to setup a fully functioning development environment is to start our Dev Container in VS Code:
- Ensure you have VS Code, Docker and the Dev Containers extension installed.
- Open the project root directory in VS Code.
- Press
F1, typeDev Containers: Open Folder in Container, and hit enter (or use the bottom-left corner icon in VS Code to reopen in container). - Wait until image has been build.
- Happy coding.
Locally
To set up a local development environment for NiceGUI, you’ll need to have Python 3.9+ and uv installed.
You can install uv using:
curl -LsSf https://astral.sh/uv/install.sh | sh
Then use the following command to install NiceGUI in editable mode with all dependencies:
uv sync
This will install the nicegui package and all its dependencies, and link it to your local development environment so that changes you make to the code will be immediately reflected.
Thereby enabling you to use your local version of NiceGUI in other projects.
To run the tests you need some additional setup which is described in tests/README.md.
There is no special Python version required for development. At Zauberzeug we mainly use 3.12.
File truncated at 100 lines see the full file
|
|
nicegui repositorypython website gui frontend interface robotics toolkit scripting webapp interaction interfaces |
|
|
nicegui repositorypython website gui frontend interface robotics toolkit scripting webapp interaction interfaces |
|
|
nicegui repositorypython website gui frontend interface robotics toolkit scripting webapp interaction interfaces |
|
|
nicegui repositorypython website gui frontend interface robotics toolkit scripting webapp interaction interfaces |