
No version for distro humble. Known supported distros are highlighted in the buttons above.
No version for distro jazzy. Known supported distros are highlighted in the buttons above.
No version for distro kilted. Known supported distros are highlighted in the buttons above.
No version for distro rolling. Known supported distros are highlighted in the buttons above.
Repository Summary
| Description | ROS 2 package to control Raspberry Pi GPIO pins |
| Checkout URI | https://github.com/mlherd/ros2_pi_gpio.git |
| VCS Type | git |
| VCS Version | master |
| Last Updated | 2020-04-13 |
| Dev Status | UNKNOWN |
| Released | UNRELEASED |
| Tags | No category tags. |
| Contributing |
Help Wanted (-)
Good First Issues (-) Pull Requests to Review (-) |
Packages
| Name | Version |
|---|---|
| pi_gpio | 0.8.2 |
| pi_gpio_interface | 0.7.1 |
README
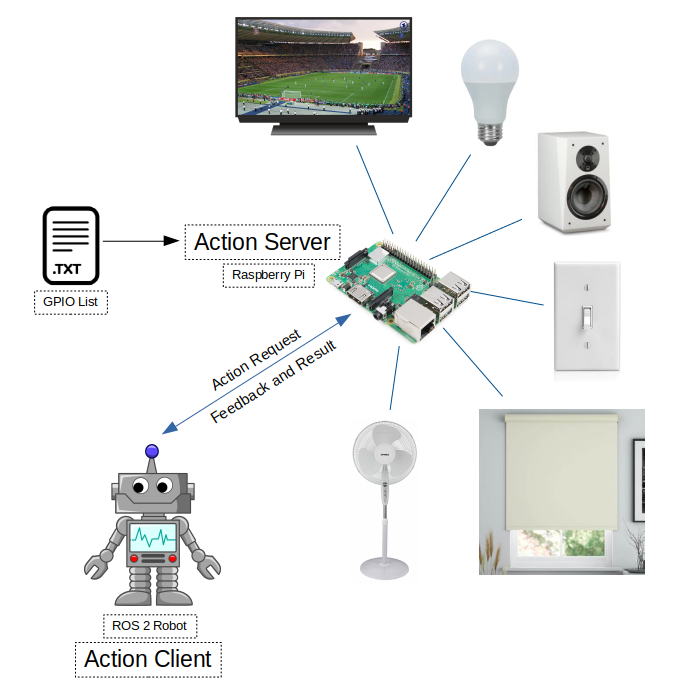
ROS 2 Raspberry Pi GPIO Control Package
ROS 2 package to control Raspberry Pi GPIO pins
This packages allows you set and read Raspberry Pi GPIO pins via ROS 2 action calls.
Tested with Raspberry Pi3, ROS2 Eloquent, and Ubuntu 18.04 Server
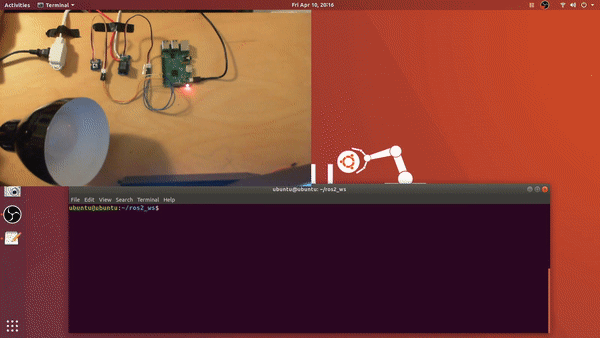
Link to the project video: https://www.linkedin.com/embed/feed/update/urn:li:ugcPost:6654600397346484224
Demo:
1. Build Instructions
 source /opt/ros/<ros2_distro>/setup.bash
 mkdir <your_ros2_ws_name>
 cd your_ros2_ws_name
 mkdir src
 cd src
 git clone https://github.com/mlherd/ros2_pi_gpio.git
 cd ..
 colcon build --sysmlink-install
 source install/setup.bash
2. Usage
-
2.1 Setup Raspberry Pi
- Download Ubuntu Server 64-bit
- https://ubuntu.com/download/raspberry-pi
- Flash the image file on your MicroSD card. I use Etcher on Ubuntu and Rufus on Windows.
- Etcher: https://www.balena.io/etcher/
- Rufus: https://rufus.ie/
- Default user name is ubuntu and password is ubuntu.
- Set up WiFi connection. You can skip this step if you want use the eternet port.
- sudo nano /etc/netplan/50-cloud-init.yaml
- ```
network:
ethernets:
eth0:
dhcp4: true
optional: true
version: 2
wifis:
wlan0:
optional: true
dhcp4: true
access-points:
“
": password: " "
- Download Ubuntu Server 64-bit
        - Save the file and apply the changes
          -
```sudo netplan --debug try
      -  ```sudo netplan --debug generate ```
      -  ```sudo netplan --debug apply ```

- Generate SSH Keys
  -  ```sudo ssh-keygen -A ```

- Install ROS 2 Eloquent
  -  ```https://index.ros.org/doc/ros2/Installation/Eloquent/Linux-Install-Debians/ ```
  - Make sure you install ROS-Base Install (Bare Bones)

- Install development tools and ROS tools
  -  ```https://index.ros.org/doc/ros2/Installation/Eloquent/Linux-Development-Setup/ ```
-
2.3 Edit gpio_pins.txt
-
, - example:
- 17,out
- 18,in
-
-
2.4 Run pi_gpio_server
- You may need to have super user permissions to access GPIO pins
sudo suros2 run pi_gpio pi_gpio_server
-
2.5 Send goals to the action server
- example via command line interface:
- ros2 action send_goal
ros2 action send_goal pi_gpio_server pi_gpio_interface/action/GPIO {'gpio: "17,high"'}ros2 action send_goal pi_gpio_server pi_gpio_interface/action/GPIO {'gpio: "18,low"'}ros2 action send_goal pi_gpio_server pi_gpio_interface/action/GPIO {'gpio: "18,read"'}
- ros2 action send_goal
- example via command line interface:
3. Nodes
-
3.1 /pi_gpio_server
- ROS 2 action server node
-
3.1.1 Actions
- Action name: pi_gpio
- Action type: pi_gpio_interface/action/GPIO
- pi_gpio (pi_gpio_interface/action/GPIO)
- Goal
- string gpio
- Result
- int32 value
- Feedback
- int32 feedback
- Goal
CONTRIBUTING
No version for distro galactic. Known supported distros are highlighted in the buttons above.
No version for distro iron. Known supported distros are highlighted in the buttons above.
No version for distro melodic. Known supported distros are highlighted in the buttons above.
No version for distro noetic. Known supported distros are highlighted in the buttons above.