
Package Summary
| Version | 5.2.0 |
| License | Apache License 2.0 |
| Build type | AMENT_CMAKE |
| Use | RECOMMENDED |
Repository Summary
| Description | A collection of examples and tutorials to illustrate how to better use the ZED cameras in the ROS2 framework |
| Checkout URI | https://github.com/stereolabs/zed-ros2-examples.git |
| VCS Type | git |
| VCS Version | master |
| Last Updated | 2026-02-10 |
| Dev Status | UNKNOWN |
| Released | UNRELEASED |
| Contributing |
Help Wanted (-)
Good First Issues (-) Pull Requests to Review (-) |
Package Description
Maintainers
- TODO
Authors
- TODO
TUTORIAL - Robot integration
This tutorial explains how to use the xacro tool to add the ZED camera to the URDF of a robot.
There are two different configurations to use when adding a ZED to a robot, which one to select depends on how you plan to localize the robot in the map:
- Localize the robot by using exclusively the ZED Positional Tracking
- Localize the robot by using the ROS 2 tools (e.g. the Robot Localization package) to fuse different sources of odometry and pose estimation.
Install the dependencies
For the scope of this tutorial, we use the AgileX Scout Mini 4WD robot as a reference, but the explained concepts apply to all the robots in the same way.
You can install the required packages by using the following commands:
cd <ros2_workspace>/src
git clone https://github.com/stereolabs/scout_ros2.git
git clone https://github.com/westonrobot/ugv_sdk.git
git clone https://github.com/westonrobot/async_port.git
cd ..
sudo apt update
rosdep update
rosdep install --from-paths src --ignore-src -r -y # install dependencies
colcon build --symlink-install --cmake-args=-DCMAKE_BUILD_TYPE=Release --parallel-workers $(nproc) # build the workspace
source ~/.bashrc
Create the URDF file by using xacro
xacro is an XML macro language. With xacro, you can construct shorter and more readable XML files by using macros that expand to larger XML expressions.
With xacro you can use parameters, variables, constants, and apply math formulas to customize the URDF model of the robot according to the used configuration.
Two different configurations are proposed:
- mono-camera: how to add a single ZED camera to the robot
- multi-camera: how to add multiple ZED cameras to the robot. The tutorials explains how to create a dual-camera configuration, but the concepts can be generalized to N cameras.
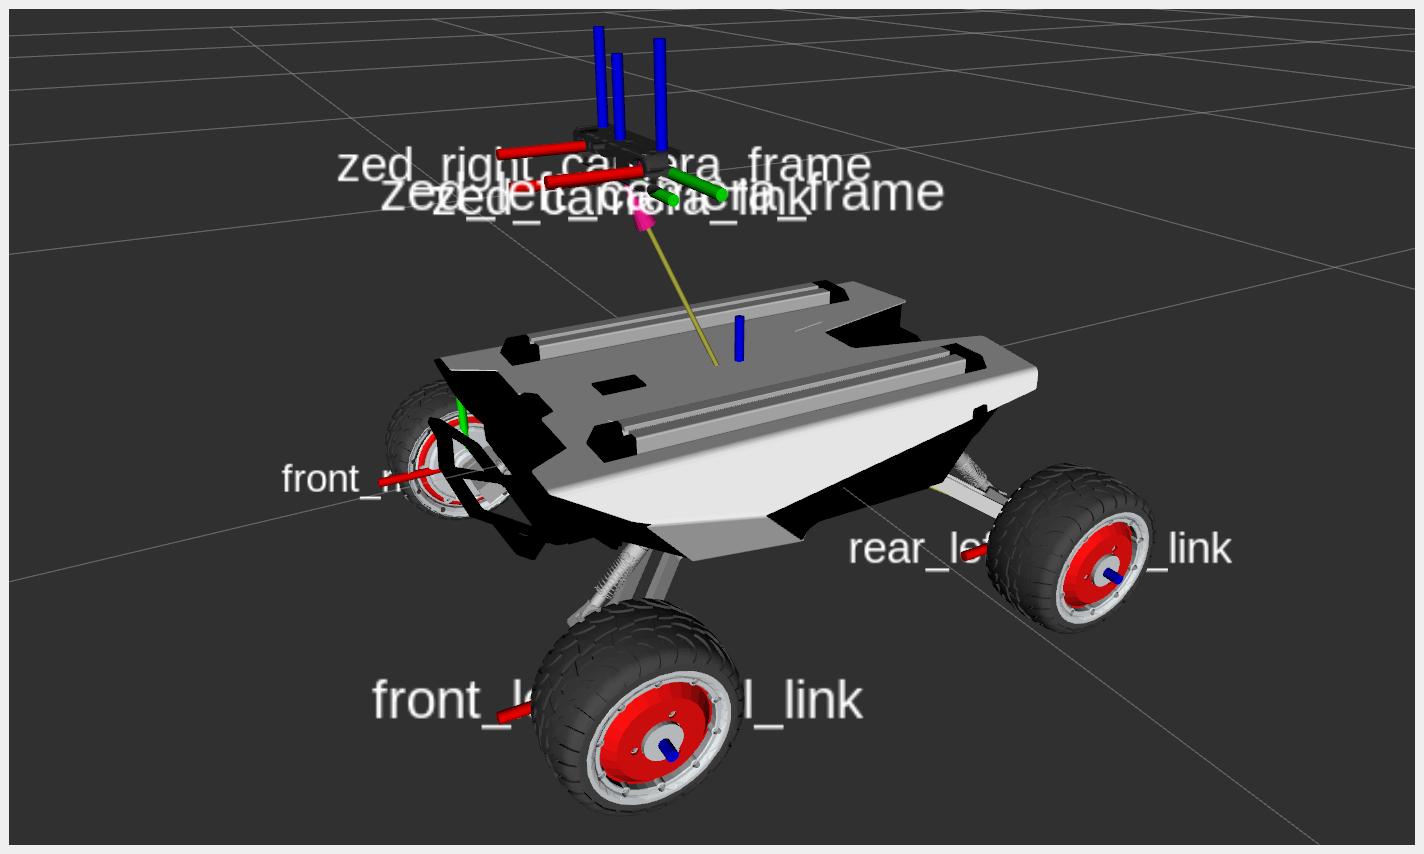
Mono-Camera Configuration
The xacro file urdf/zed_robot_mono.urdf.xacro defines the robot configuration required to obtain the result of the following picture.
Set the parameters
Three xacro arguments are defined at the very beginning of the example zed_robot_mono.urdf.xacro file to configure the robot:
  <xacro:arg name="camera_name"   default="zed" />
  <xacro:arg name="camera_model"  default="zed" />
  <xacro:arg name="use_zed_localization" default="true" />
-
camera_name: sets the name of the camera to be used as prefix for the name of the links and joints of the camera URDF. -
camera_model: sets the model of the camera to load the relative visual 3D mesh, set the camera dimensions, and set the values biases for the mounting points. -
use_zed_localization: allows to set the correct TF tree in case ZED Localization is used as the main localization engine, or an external localization engine (e.g. the Robot Localization package) is used.
Add a Robot model
First of all the URDF must contain the description of the robot. In this tutoria we import the scout_mini.xacro file from the scout_description package.
We provide this file in the GitHub repository scout_ros2 that is a fork of the original repository with a few customizations and fixes.
<xacro:include filename="$(find scout_description)/urdf/scout_mini.xacro" />
The file scout_mini.xacro defines a link called base_link that will be the reference link to place the camera on the robot.
You can use other links as a reference, but it’s important that you respect the conventions explained in the next section.
Add a ZED Camera
To use a ZED camera we must include the xacro file that describes the links and joints of a ZED camera. The file is available in the zed_wrapper package of the zed-ros2-wrapper repository.
<xacro:include filename="$(find zed_wrapper)/urdf/zed_macro.urdf.xacro" />
Next we can add one ZED camera of type camera_model with name camera_name, as defined with the correspondent xacro arguments:
<xacro:zed_camera name="$(arg camera_name)" model="$(arg camera_model)" />
Add a joint to the URDF to place the ZED Camera on the Robot
This is the most important part of the xacro file. Here we can connect the camera to the robot, and define the relative position and orientation.
The ZED URDF defines a reference link called <camera_name>_camera_link. This is the link that must be used to connect the camera to the URDF that describes a robot.
The most common way to place the camera on the robot is to add a joint that connects <camera_name>_camera_link to the base_link frame of the robot.
This is not mandatory, you can connect the camera to the link of the robot that you prefer. In any case, it is important that the TF chain map -> odom -> [...] -> <camera_name>_camera_link is not broken (see REP 105 as a reference).
There is an important matter that needs to be considered: if you plan to use the ZED Positional Tracking module, and you set the parameter pos_tracking.publish_tf of the ZED node to true, then the <camera_name>_camera_link must be the root frame of the robot to correctly localize it on the map.
The following part of the zed_robot_mono.urdf.xacro allows to create the joint according to the value of the argument use_zed_localization:
File truncated at 100 lines see the full file
Package Dependencies
| Deps | Name |
|---|---|
| ament_cmake_auto | |
| ament_cmake | |
| zed_wrapper | |
| zed_msgs | |
| scout_description | |
| xacro | |
| ament_lint_auto | |
| ament_lint_common |
System Dependencies
Dependant Packages
Launch files
Messages
Services
Plugins
Recent questions tagged zed_robot_integration at Robotics Stack Exchange
Package Summary
| Version | 5.2.0 |
| License | Apache License 2.0 |
| Build type | AMENT_CMAKE |
| Use | RECOMMENDED |
Repository Summary
| Description | A collection of examples and tutorials to illustrate how to better use the ZED cameras in the ROS2 framework |
| Checkout URI | https://github.com/stereolabs/zed-ros2-examples.git |
| VCS Type | git |
| VCS Version | master |
| Last Updated | 2026-02-10 |
| Dev Status | UNKNOWN |
| Released | UNRELEASED |
| Contributing |
Help Wanted (-)
Good First Issues (-) Pull Requests to Review (-) |
Package Description
Maintainers
- TODO
Authors
- TODO
TUTORIAL - Robot integration
This tutorial explains how to use the xacro tool to add the ZED camera to the URDF of a robot.
There are two different configurations to use when adding a ZED to a robot, which one to select depends on how you plan to localize the robot in the map:
- Localize the robot by using exclusively the ZED Positional Tracking
- Localize the robot by using the ROS 2 tools (e.g. the Robot Localization package) to fuse different sources of odometry and pose estimation.
Install the dependencies
For the scope of this tutorial, we use the AgileX Scout Mini 4WD robot as a reference, but the explained concepts apply to all the robots in the same way.
You can install the required packages by using the following commands:
cd <ros2_workspace>/src
git clone https://github.com/stereolabs/scout_ros2.git
git clone https://github.com/westonrobot/ugv_sdk.git
git clone https://github.com/westonrobot/async_port.git
cd ..
sudo apt update
rosdep update
rosdep install --from-paths src --ignore-src -r -y # install dependencies
colcon build --symlink-install --cmake-args=-DCMAKE_BUILD_TYPE=Release --parallel-workers $(nproc) # build the workspace
source ~/.bashrc
Create the URDF file by using xacro
xacro is an XML macro language. With xacro, you can construct shorter and more readable XML files by using macros that expand to larger XML expressions.
With xacro you can use parameters, variables, constants, and apply math formulas to customize the URDF model of the robot according to the used configuration.
Two different configurations are proposed:
- mono-camera: how to add a single ZED camera to the robot
- multi-camera: how to add multiple ZED cameras to the robot. The tutorials explains how to create a dual-camera configuration, but the concepts can be generalized to N cameras.
Mono-Camera Configuration
The xacro file urdf/zed_robot_mono.urdf.xacro defines the robot configuration required to obtain the result of the following picture.
Set the parameters
Three xacro arguments are defined at the very beginning of the example zed_robot_mono.urdf.xacro file to configure the robot:
  <xacro:arg name="camera_name"   default="zed" />
  <xacro:arg name="camera_model"  default="zed" />
  <xacro:arg name="use_zed_localization" default="true" />
-
camera_name: sets the name of the camera to be used as prefix for the name of the links and joints of the camera URDF. -
camera_model: sets the model of the camera to load the relative visual 3D mesh, set the camera dimensions, and set the values biases for the mounting points. -
use_zed_localization: allows to set the correct TF tree in case ZED Localization is used as the main localization engine, or an external localization engine (e.g. the Robot Localization package) is used.
Add a Robot model
First of all the URDF must contain the description of the robot. In this tutoria we import the scout_mini.xacro file from the scout_description package.
We provide this file in the GitHub repository scout_ros2 that is a fork of the original repository with a few customizations and fixes.
<xacro:include filename="$(find scout_description)/urdf/scout_mini.xacro" />
The file scout_mini.xacro defines a link called base_link that will be the reference link to place the camera on the robot.
You can use other links as a reference, but it’s important that you respect the conventions explained in the next section.
Add a ZED Camera
To use a ZED camera we must include the xacro file that describes the links and joints of a ZED camera. The file is available in the zed_wrapper package of the zed-ros2-wrapper repository.
<xacro:include filename="$(find zed_wrapper)/urdf/zed_macro.urdf.xacro" />
Next we can add one ZED camera of type camera_model with name camera_name, as defined with the correspondent xacro arguments:
<xacro:zed_camera name="$(arg camera_name)" model="$(arg camera_model)" />
Add a joint to the URDF to place the ZED Camera on the Robot
This is the most important part of the xacro file. Here we can connect the camera to the robot, and define the relative position and orientation.
The ZED URDF defines a reference link called <camera_name>_camera_link. This is the link that must be used to connect the camera to the URDF that describes a robot.
The most common way to place the camera on the robot is to add a joint that connects <camera_name>_camera_link to the base_link frame of the robot.
This is not mandatory, you can connect the camera to the link of the robot that you prefer. In any case, it is important that the TF chain map -> odom -> [...] -> <camera_name>_camera_link is not broken (see REP 105 as a reference).
There is an important matter that needs to be considered: if you plan to use the ZED Positional Tracking module, and you set the parameter pos_tracking.publish_tf of the ZED node to true, then the <camera_name>_camera_link must be the root frame of the robot to correctly localize it on the map.
The following part of the zed_robot_mono.urdf.xacro allows to create the joint according to the value of the argument use_zed_localization:
File truncated at 100 lines see the full file
Package Dependencies
| Deps | Name |
|---|---|
| ament_cmake_auto | |
| ament_cmake | |
| zed_wrapper | |
| zed_msgs | |
| scout_description | |
| xacro | |
| ament_lint_auto | |
| ament_lint_common |