
|
stretch_funmap package from stretch_ros2 repohello_helpers stretch_calibration stretch_core stretch_deep_perception stretch_demos stretch_description stretch_funmap stretch_nav2 stretch_rtabmap stretch_simulation |
ROS Distro
|
Package Summary
| Version | 0.1.0 |
| License | Apache License 2.0 |
| Build type | AMENT_PYTHON |
| Use | RECOMMENDED |
Repository Summary
| Description | |
| Checkout URI | https://github.com/hello-robot/stretch_ros2.git |
| VCS Type | git |
| VCS Version | humble |
| Last Updated | 2026-03-13 |
| Dev Status | UNKNOWN |
| Released | UNRELEASED |
| Contributing |
Help Wanted (-)
Good First Issues (-) Pull Requests to Review (-) |
Package Description
Maintainers
- Hello Robot Inc.
Authors

Overview
stretch_funmap is an implementation of Fast Unified Navigation, Manipulation And Planning (FUNMAP). FUNMAP provides navigation, manipulation, and planning capabilities for the Stretch mobile manipulator. stretch_funmap includes examples of efficient ways to take advantage of the Stretch’s unique properties.
Previous commercially-available mobile manipulators have consisted of a serial manipulator (i.e., links connected by rotary joints) placed on a mobile base [1]. Widely used software (e.g., the Robot Operating System (ROS)) [1] typically expects a velocity-controlled mobile base that can be held still while the arm manipulates [3, 4].
In contrast, the Stretch’s mobile base is integral to manipulation and typically moves throughout a task. It can also perform high-fidelity position control with its mobile base. FUNMAP uses approximate geometric models and computer-vision algorithms to efficiently find plans that take advantage of its prismatic joints (e.g., telescoping arm) and Cartesian structure. In contrast to typical approaches that treat navigation (e.g., ROS Navigation Stack ) and manipulation (e.g., MoveIt! [5, 6]) separately, FUNMAP does both.
Getting Started Demo
First, make sure that your Stretch has clearance to rotate in place and will rotate without straining any cables connected to the trunk. Ideally, you should have the robot untethered.
Next, run the following launch file:
ros2 launch stretch_funmap mapping.launch.py
In another terminal, run the keyboard teleoperation node:
ros2 run stretch_core keyboard_teleop --ros-args -p mapping_on:=True
Now, you will take a head scan, which will involve the head panning around, the base rotating, and the head panning around again to overcome the blindspot due to the mast.
While in the terminal in which you started the `keyboard_teleop` node, press the space bar to initiate the head scan.
At this point, you should see a 3D map resulting from the head scan in RViz. You can rotate it around and look at it. It has been created by merging many 3D scans.
If you have the robot untethered, you can now specify a navigation goal for the robot. If the robot finds a navigation plan to the goal, it will attempt to navigate to it. While navigating, it will look down with its 3D camera in an attempt to stop if it detects an obstacle.
In RViz, press the "2D Nav Goal" button on the top bar with a magenta arrow icon.
Specify a nearby navigation goal pose on the floor of the map by clicking and drawing a magenta arrow.
For this to work, the navigation goal must be in a place that the robot can reach and that the robot has scanned well. For example, the robot will only navigate across floor regions that it has in its map.
If the robot finds a path, you should see green lines connecting white spheres in RViz that display its plan as it attempts to navigate to the goal.
Once the robot has reached the goal, you can take another head scan.
While in the terminal, press the space bar to initiate another head scan.
The robot should take the head scan and merge it with the previous scans. If all goes well, the merged 3D map will be visible in RViz.
You can also have the robot automatically drive to a place that it thinks is a good place for it to take a head scan in order to map the environment.
While in the terminal, press the key with \ and | on it.
This should work even if caps lock is enabled or the shift key is pressed.
If the robot reached it’s goal, then you can now take another head scan.
While in the terminal, press the space bar to initiate another head scan.
By repeating this process, you can create a 3D map of the environment. FUNMAP uses images to represent the environment with each pixel value representing the highest observed 3D point at a planar location. By default, all of the merged maps are saved to the following directory:
./stretch_user/debug/merged_maps/
You can see the image representations by looking at files with the following naming pattern:
./stretch_user/debug/merged_maps/merged_map_DATETIME_mhi_visualization.png
You can also click on a reaching goal for the Stretch by clicking on “Publish Point” in Rviz and then selecting a 3D point on the map. FUNMAP will attempt to generate a navigation and manipulation plan to reach close to the selected 3D location with Stretch’s gripper.
In RViz, select a reach goal by clicking on "Publish Point" on the top bar with a red map location icon).
Then, click on a 3D location on the map to specify a reaching target for the robot's gripper.
That concludes the demonstration. Have fun with FUNMAP!
More FUNMAP
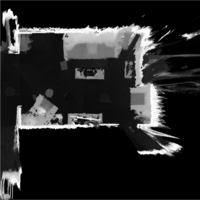
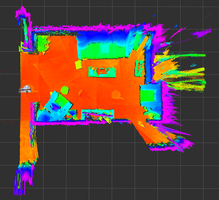

FUNMAP represents human environments with Max Height Images (MHIs). An MHI is an image for which each pixel typically represents the height of the robot’s environment. Given a volume of interest (VOI) with its z-axis aligned with gravity, an MHI, I, maps locations to heights. Specifically, I(x,y)=z, where (x,y) represents a discretized planar location within the VOI and z represents the discretized height of the maximum occupied voxel within the VOI at that planar location (see Figure 1 above).
File truncated at 100 lines see the full file
Package Dependencies
| Deps | Name |
|---|---|
| ament_copyright | |
| ament_flake8 | |
| ament_pep257 | |
| actionlib_msgs | |
| geometry_msgs | |
| nav_msgs | |
| nav2_msgs | |
| control_msgs | |
| trajectory_msgs | |
| rclpy | |
| std_msgs | |
| std_srvs | |
| tf2 |
System Dependencies
| Name |
|---|
| python3-pytest |
Dependant Packages
Launch files
Messages
Services
Plugins
Recent questions tagged stretch_funmap at Robotics Stack Exchange
|
|
stretch_funmap package from stretch_ros2 repohello_helpers stretch_calibration stretch_core stretch_deep_perception stretch_demos stretch_description stretch_funmap stretch_nav2 stretch_rtabmap stretch_simulation |
ROS Distro
|
Package Summary
| Version | 0.1.0 |
| License | Apache License 2.0 |
| Build type | AMENT_PYTHON |
| Use | RECOMMENDED |
Repository Summary
| Description | |
| Checkout URI | https://github.com/hello-robot/stretch_ros2.git |
| VCS Type | git |
| VCS Version | humble |
| Last Updated | 2026-03-13 |
| Dev Status | UNKNOWN |
| Released | UNRELEASED |
| Contributing |
Help Wanted (-)
Good First Issues (-) Pull Requests to Review (-) |
Package Description
Maintainers
- Hello Robot Inc.
Authors
Overview
stretch_funmap is an implementation of Fast Unified Navigation, Manipulation And Planning (FUNMAP). FUNMAP provides navigation, manipulation, and planning capabilities for the Stretch mobile manipulator. stretch_funmap includes examples of efficient ways to take advantage of the Stretch’s unique properties.
Previous commercially-available mobile manipulators have consisted of a serial manipulator (i.e., links connected by rotary joints) placed on a mobile base [1]. Widely used software (e.g., the Robot Operating System (ROS)) [1] typically expects a velocity-controlled mobile base that can be held still while the arm manipulates [3, 4].
In contrast, the Stretch’s mobile base is integral to manipulation and typically moves throughout a task. It can also perform high-fidelity position control with its mobile base. FUNMAP uses approximate geometric models and computer-vision algorithms to efficiently find plans that take advantage of its prismatic joints (e.g., telescoping arm) and Cartesian structure. In contrast to typical approaches that treat navigation (e.g., ROS Navigation Stack ) and manipulation (e.g., MoveIt! [5, 6]) separately, FUNMAP does both.
Getting Started Demo
First, make sure that your Stretch has clearance to rotate in place and will rotate without straining any cables connected to the trunk. Ideally, you should have the robot untethered.
Next, run the following launch file:
ros2 launch stretch_funmap mapping.launch.py
In another terminal, run the keyboard teleoperation node:
ros2 run stretch_core keyboard_teleop --ros-args -p mapping_on:=True
Now, you will take a head scan, which will involve the head panning around, the base rotating, and the head panning around again to overcome the blindspot due to the mast.
While in the terminal in which you started the `keyboard_teleop` node, press the space bar to initiate the head scan.
At this point, you should see a 3D map resulting from the head scan in RViz. You can rotate it around and look at it. It has been created by merging many 3D scans.
If you have the robot untethered, you can now specify a navigation goal for the robot. If the robot finds a navigation plan to the goal, it will attempt to navigate to it. While navigating, it will look down with its 3D camera in an attempt to stop if it detects an obstacle.
In RViz, press the "2D Nav Goal" button on the top bar with a magenta arrow icon.
Specify a nearby navigation goal pose on the floor of the map by clicking and drawing a magenta arrow.
For this to work, the navigation goal must be in a place that the robot can reach and that the robot has scanned well. For example, the robot will only navigate across floor regions that it has in its map.
If the robot finds a path, you should see green lines connecting white spheres in RViz that display its plan as it attempts to navigate to the goal.
Once the robot has reached the goal, you can take another head scan.
While in the terminal, press the space bar to initiate another head scan.
The robot should take the head scan and merge it with the previous scans. If all goes well, the merged 3D map will be visible in RViz.
You can also have the robot automatically drive to a place that it thinks is a good place for it to take a head scan in order to map the environment.
While in the terminal, press the key with \ and | on it.
This should work even if caps lock is enabled or the shift key is pressed.
If the robot reached it’s goal, then you can now take another head scan.
While in the terminal, press the space bar to initiate another head scan.
By repeating this process, you can create a 3D map of the environment. FUNMAP uses images to represent the environment with each pixel value representing the highest observed 3D point at a planar location. By default, all of the merged maps are saved to the following directory:
./stretch_user/debug/merged_maps/
You can see the image representations by looking at files with the following naming pattern:
./stretch_user/debug/merged_maps/merged_map_DATETIME_mhi_visualization.png
You can also click on a reaching goal for the Stretch by clicking on “Publish Point” in Rviz and then selecting a 3D point on the map. FUNMAP will attempt to generate a navigation and manipulation plan to reach close to the selected 3D location with Stretch’s gripper.
In RViz, select a reach goal by clicking on "Publish Point" on the top bar with a red map location icon).
Then, click on a 3D location on the map to specify a reaching target for the robot's gripper.
That concludes the demonstration. Have fun with FUNMAP!
More FUNMAP
FUNMAP represents human environments with Max Height Images (MHIs). An MHI is an image for which each pixel typically represents the height of the robot’s environment. Given a volume of interest (VOI) with its z-axis aligned with gravity, an MHI, I, maps locations to heights. Specifically, I(x,y)=z, where (x,y) represents a discretized planar location within the VOI and z represents the discretized height of the maximum occupied voxel within the VOI at that planar location (see Figure 1 above).
File truncated at 100 lines see the full file
Package Dependencies
| Deps | Name |
|---|---|
| ament_copyright | |
| ament_flake8 | |
| ament_pep257 | |
| actionlib_msgs | |
| geometry_msgs | |
| nav_msgs | |
| nav2_msgs | |
| control_msgs | |
| trajectory_msgs | |
| rclpy | |
| std_msgs | |
| std_srvs | |
| tf2 |
System Dependencies
| Name |
|---|
| python3-pytest |